Mar 13, 2025
Articles
Building a Serverless Push Notification System with Supabase Edge Functions

Paul Waweru
Introduction
Push notifications are the lifeblood of modern apps – they bring users back, deliver timely updates and increase engagement. However, here's the challenge - most developers default to third-party services like OneSignal or CleverTap which adds extra costs and dependencies to your project.
What if you could build your own serverless push notification system that you fully control?
This guide walks you through creating a complete push notification system using Supabase Edge Functions and Apple Push Notification Service (APNs) for iOS apps built with Expo. You'll gain full control over your notification infrastructure while keeping costs down and ensuring speedy delivery.
Note: This guide focuses on iOS integration. We'll cover Android/FCM implementation in a future article.
You can access the codebase used in this project here.
Prerequisites
Before diving in, make sure you have:
Expo experience: Familiarity with expo-notifications and handling permissions
Supabase knowledge: Understanding of Edge Functions creation, deployment, and execution using the Supabase CLI
Physical iOS device: The iOS simulator doesn't support push notifications
Active iOS Developer Account: Required for generating APNs authentication keys
Why Supabase for Push Notifications?
You might wonder why build on Supabase instead of using existing notification services. Here's why:
Complete control: Using Supabase allows full ownership of the notification infrastructure without depending on external services.
Automatic scaling: Edge Functions scale automatically with demand, eliminating the need to manage infrastructure scaling manually.
Performance optimisation: Edge Functions typically run in data centers closer to users' geographical locations, which can reduce latency for notification delivery.
Cost efficiency: The pay-per-execution model can be more cost-effective than subscription-based notification services, especially for applications with variable notification volumes.
System Overview
Our notification system consists of five key components:
APNs Authentication: Secure connection to Apple's notification service
Supabase Database: Storage for device tokens and user notification preferences
Supabase Edge Function: Handler for push notification delivery
Client Integration: Permission management and device token registration
Trigger Mechanism: Event-based notification dispatching
Implementation Steps
1. Configuring APNs Authentication
To send iOS notifications, you first need to generate an APNs key:
Go to App Store Connect > Certificates, Identifiers & Profiles
Navigate to the Keys section and create a new key
Enable Apple Push Notifications service
Give your key a descriptive name and choose the appropriate environment:
Sandbox for development
Production for live apps
Download the .p8 authentication key file (important: you can only download this once)
Store these key details securely – you'll need them for your Edge Function
You can check out the following video for a step-by-step guide on creating your APNs key.
2. Supabase Database Schema Design
Next, let's set up a table in Supabase to store device tokens and notification preferences:
CREATE TABLE public.registered_devices (
    id BIGSERIAL PRIMARY KEY,
    created_at TIMESTAMPTZ NOT NULL DEFAULT NOW(),
    device_token VARCHAR NOT NULL,
    device_type VARCHAR NOT NULL,
    enabled_notifications BOOLEAN NOT NULL DEFAULT TRUE,
    UNIQUE(device_token)
)
This schema includes:
User reference with appropriate foreign key constraints
Device token for push notification addressing
Platform identification for multi-platform support
Toggle mechanisms for notification preferences
Timestamp fields for auditing and analytics
For proper security, implement row-level security (RLS) policies:
-- Enable RLS
ALTER TABLE public.registered_devices_example ENABLE ROW LEVEL
3. Supabase Edge Function Implementation
The heart of our system is the Edge Function that will:
Generate authentication tokens for APNs
Retrieve registered device tokens from the database
Format and send notifications to the appropriate endpoints
Environment Configuration
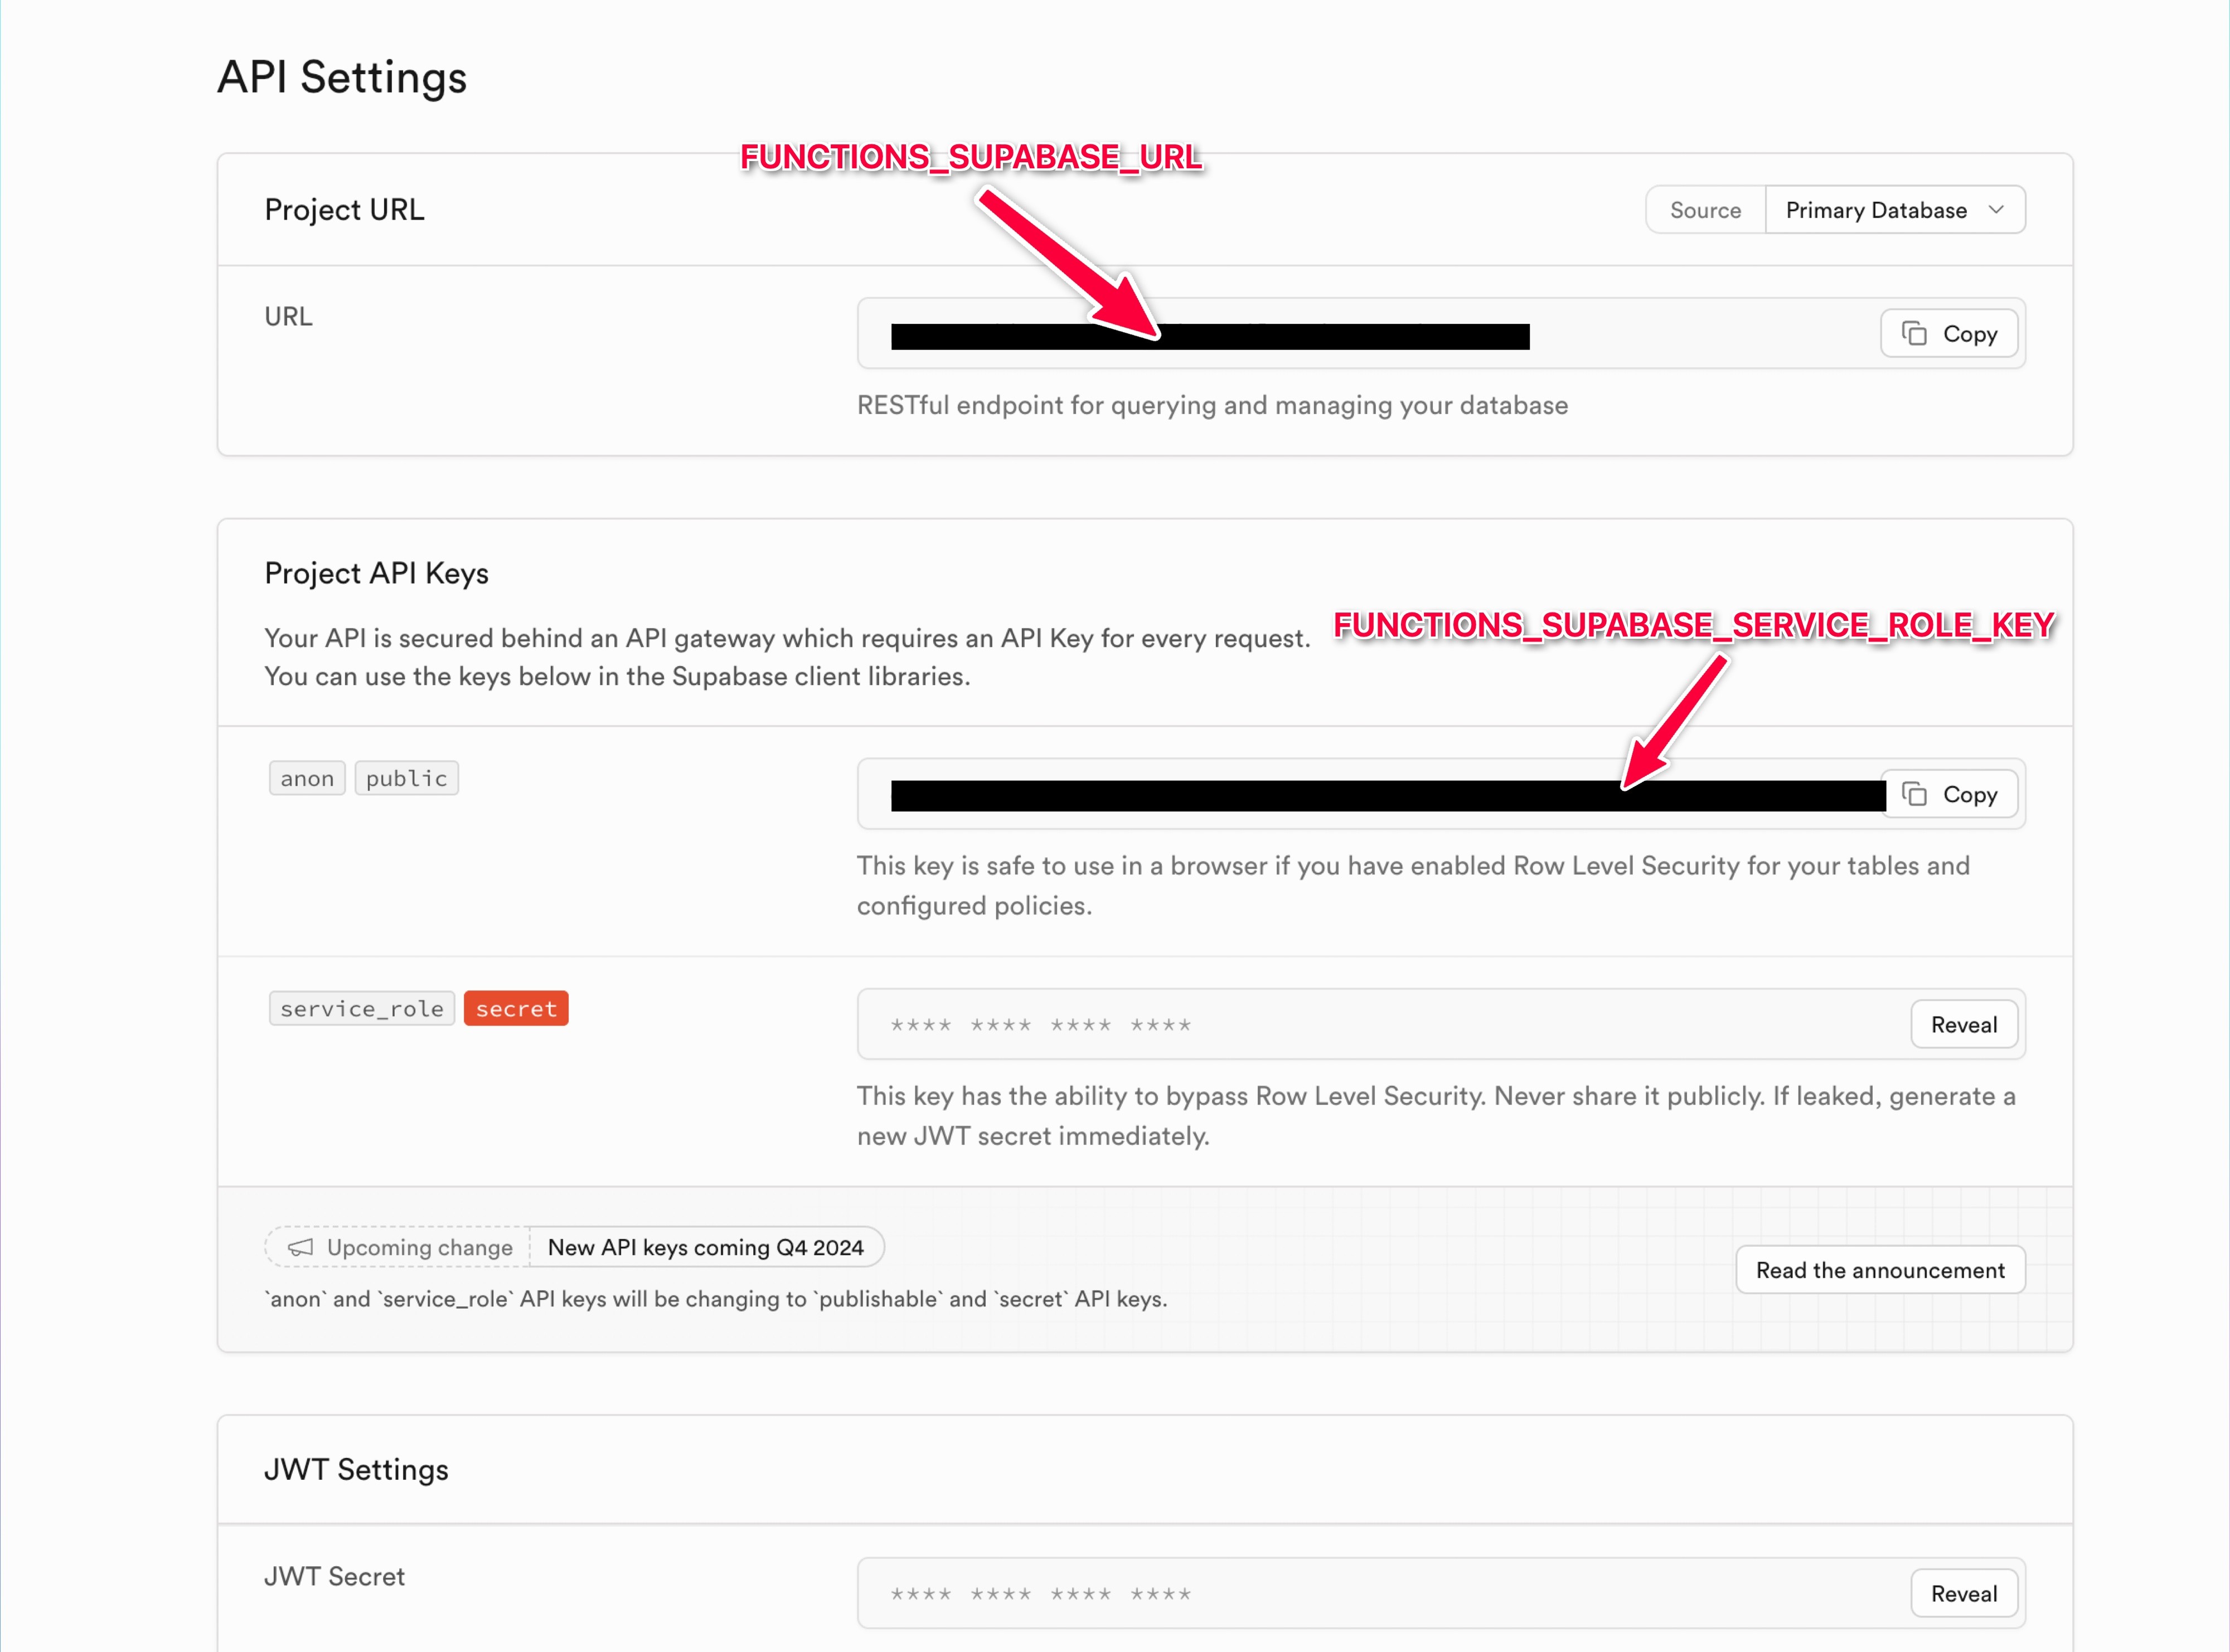
First, set up the necessary environment variables. Here's what you'll need (you can see the example env file here):
FUNCTIONS_SUPABASE_URL & FUNCTIONS_SUPABASE_SERVICE_ROLE_KEY: Found in your Supabase project under API settings.
APNS_AUTH_KEY_BASE64: Convert your .p8 authentication key downloaded earlier from Apple Developer to a Base64 string using the following command:
cat AuthKey_XXXXXXXXXX.p8 | base64
APNS_KEY_ID: The identifier shown when you created your APNs key

APNS_TEAM_ID: Found in your Apple Developer account homepage (a 10-character alphanumeric string):

APNS_BUNDLE_ID: Your app's bundle ID, which must match the registered app in your Apple Developer account:

Edge Function Entry Point
Next, define the main entry point of our Supabase Edge Function. This function will handle incoming requests, send a test notification, and return the result. You can find the example of the entry point here.
Sending Push Notifications to iOS devices
The core logic for issuing push notifications can be found here and includes the following:
Fetches registered devices in the
registered_devicestable we created earlier using the supabase syntaxRetrieves the Base64-encoded .p8 key from environment variables
Converts it into a cryptographic key using crypto.subtle.importKey
Generates a JSON Web Token (JWT) to authenticate with Apple Push Notification Service (APNs) - all of which can be found here
Sends the notification payload to all devices in parallel
Returns the response from APNs for each device - all of which can be found here
4. Client Integration
The following steps focus on the iOS Expo app which will receive the push notifications. As a first step, ensure you have create a env file and added the Supabase project URL and anon key (example file here).
Setting up the Notifications Provider
The Notifications Provider ensures the app listens for incoming notifications, as well as define the behaviour when a user interacts with the notification. You can see the full implementation of the provider here.
Consuming the Provider
The next step is to consume the provider. Providers are typically added to the root of the application, otherwise known as the layout file here. This implementation:
Wraps your application with the notification provider
Ensures the app starts listening for notifications on launch
Permission Request Hook
We also need to create a hook which handles requesting notification permissions from the user (this only happens once for iOS devices, you'll need to re-install the app to prompt the user again). Refer to the hook implementation here.
UI Integration and Device Token Registration
The index file for the app is where everything pieces together. This includes:
Using the permission hook to request notification access
Retrieve and store the device token and notification preference in Supabase
Provides a toggle UI element to enable/disable notifications
You can find the implementation of the client UI here.
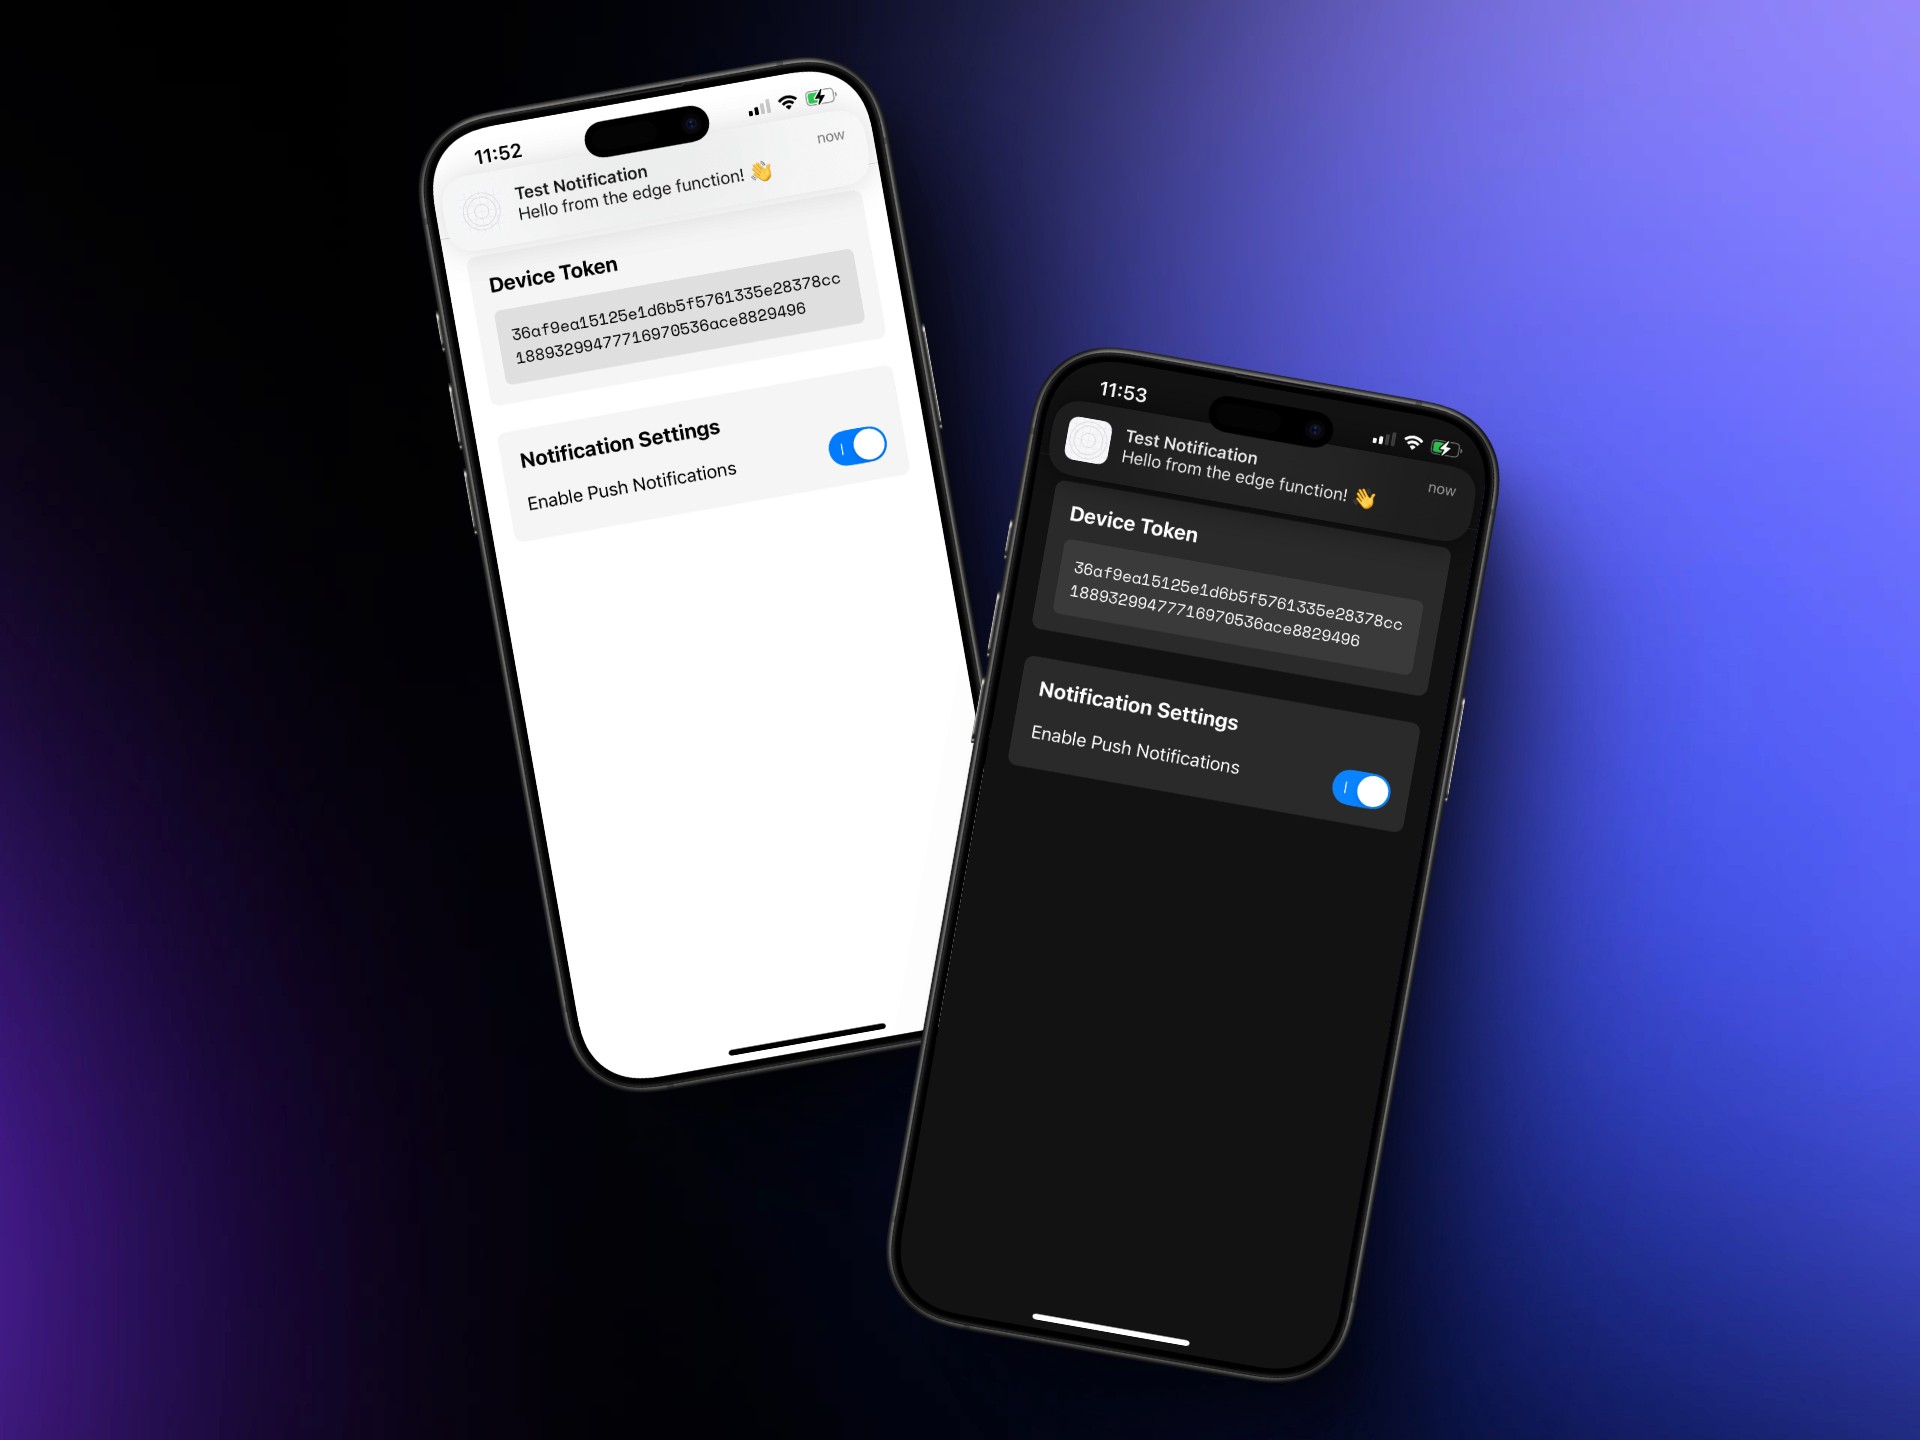
Testing the Implementation
Follow these steps to test your implementation locally:
1. Local Testing with Supabase CLI
Run your edge function locally:
supabase functions serve notifications-push --no-verify-jwt
This command starts your Edge Function locally without JWT verification, which is useful for development but should not be used in production.
2. Trigger the Function with cURL
Once your function is running locally, you can trigger it using cURL:
curl -i --location --request POST 'http://localhost:54321/functions/v1/send-notifications'
3. Verify Notification Delivery
When testing with a physical device with notifications enabled, you should see the notification appear on the device. If notifications aren't delivered, check your function logs for errors.
4. Testing the Toggle Feature
An important aspect to test is the notification toggle functionality:
Toggle notifications off in your app's UI
Run the edge function again
Verify that no notification appears on your device
This confirms that your query is correctly filtering out devices where notifications have been disabled, respecting user preferences.
Next Steps
Now that you've built your basic push notification system, you can enhance it in several valuable ways:
Set up automated push notifications using Supabase's Edge Functions with cron jobs. This enables daily digests, weekly summaries, or time-sensitive campaigns without maintaining complex infrastructure.
Create a dedicated events table to track notification sends, deliveries, and opens
Target notifications based on user behavior or preferences
Add rate limiting to prevent notification fatigue
Set up logging and alerting for critical notification failures
These enhancements will transform your basic notification system into a sophisticated engagement tool that respects user preferences while maximising the impact of your communications.
Conclusion
By building a serverless push notification system with Supabase Edge Functions, you've created a cost-effective, maintainable, and scalable solution that gives you full control over your notification infrastructure. This approach eliminates third-party dependencies while maintaining high performance and reliability.
In our next technical guide, we'll explore implementing Android notifications using Firebase Cloud Messaging (FCM) within the same Supabase Edge Function architecture.
Want to skip the heavy lifting? Check out Launchtoday.dev - an Expo boilerplate designed to help you build apps faster. It’s packed with features such as authentication, payments, including push notifications, so you can focus on creating the best experience for your users without worrying about setup.
Introduction
Push notifications are the lifeblood of modern apps – they bring users back, deliver timely updates and increase engagement. However, here's the challenge - most developers default to third-party services like OneSignal or CleverTap which adds extra costs and dependencies to your project.
What if you could build your own serverless push notification system that you fully control?
This guide walks you through creating a complete push notification system using Supabase Edge Functions and Apple Push Notification Service (APNs) for iOS apps built with Expo. You'll gain full control over your notification infrastructure while keeping costs down and ensuring speedy delivery.
Note: This guide focuses on iOS integration. We'll cover Android/FCM implementation in a future article.
You can access the codebase used in this project here.
Prerequisites
Before diving in, make sure you have:
Expo experience: Familiarity with expo-notifications and handling permissions
Supabase knowledge: Understanding of Edge Functions creation, deployment, and execution using the Supabase CLI
Physical iOS device: The iOS simulator doesn't support push notifications
Active iOS Developer Account: Required for generating APNs authentication keys
Why Supabase for Push Notifications?
You might wonder why build on Supabase instead of using existing notification services. Here's why:
Complete control: Using Supabase allows full ownership of the notification infrastructure without depending on external services.
Automatic scaling: Edge Functions scale automatically with demand, eliminating the need to manage infrastructure scaling manually.
Performance optimisation: Edge Functions typically run in data centers closer to users' geographical locations, which can reduce latency for notification delivery.
Cost efficiency: The pay-per-execution model can be more cost-effective than subscription-based notification services, especially for applications with variable notification volumes.
System Overview
Our notification system consists of five key components:
APNs Authentication: Secure connection to Apple's notification service
Supabase Database: Storage for device tokens and user notification preferences
Supabase Edge Function: Handler for push notification delivery
Client Integration: Permission management and device token registration
Trigger Mechanism: Event-based notification dispatching
Implementation Steps
1. Configuring APNs Authentication
To send iOS notifications, you first need to generate an APNs key:
Go to App Store Connect > Certificates, Identifiers & Profiles
Navigate to the Keys section and create a new key
Enable Apple Push Notifications service
Give your key a descriptive name and choose the appropriate environment:
Sandbox for development
Production for live apps
Download the .p8 authentication key file (important: you can only download this once)
Store these key details securely – you'll need them for your Edge Function
You can check out the following video for a step-by-step guide on creating your APNs key.
2. Supabase Database Schema Design
Next, let's set up a table in Supabase to store device tokens and notification preferences:
CREATE TABLE public.registered_devices (
    id BIGSERIAL PRIMARY KEY,
    created_at TIMESTAMPTZ NOT NULL DEFAULT NOW(),
    device_token VARCHAR NOT NULL,
    device_type VARCHAR NOT NULL,
    enabled_notifications BOOLEAN NOT NULL DEFAULT TRUE,
    UNIQUE(device_token)
)
This schema includes:
User reference with appropriate foreign key constraints
Device token for push notification addressing
Platform identification for multi-platform support
Toggle mechanisms for notification preferences
Timestamp fields for auditing and analytics
For proper security, implement row-level security (RLS) policies:
-- Enable RLS
ALTER TABLE public.registered_devices_example ENABLE ROW LEVEL
3. Supabase Edge Function Implementation
The heart of our system is the Edge Function that will:
Generate authentication tokens for APNs
Retrieve registered device tokens from the database
Format and send notifications to the appropriate endpoints
Environment Configuration
First, set up the necessary environment variables. Here's what you'll need (you can see the example env file here):
FUNCTIONS_SUPABASE_URL & FUNCTIONS_SUPABASE_SERVICE_ROLE_KEY: Found in your Supabase project under API settings.
APNS_AUTH_KEY_BASE64: Convert your .p8 authentication key downloaded earlier from Apple Developer to a Base64 string using the following command:
cat AuthKey_XXXXXXXXXX.p8 | base64
APNS_KEY_ID: The identifier shown when you created your APNs key
APNS_TEAM_ID: Found in your Apple Developer account homepage (a 10-character alphanumeric string):
APNS_BUNDLE_ID: Your app's bundle ID, which must match the registered app in your Apple Developer account:
Edge Function Entry Point
Next, define the main entry point of our Supabase Edge Function. This function will handle incoming requests, send a test notification, and return the result. You can find the example of the entry point here.
Sending Push Notifications to iOS devices
The core logic for issuing push notifications can be found here and includes the following:
Fetches registered devices in the
registered_devicestable we created earlier using the supabase syntaxRetrieves the Base64-encoded .p8 key from environment variables
Converts it into a cryptographic key using crypto.subtle.importKey
Generates a JSON Web Token (JWT) to authenticate with Apple Push Notification Service (APNs) - all of which can be found here
Sends the notification payload to all devices in parallel
Returns the response from APNs for each device - all of which can be found here
4. Client Integration
The following steps focus on the iOS Expo app which will receive the push notifications. As a first step, ensure you have create a env file and added the Supabase project URL and anon key (example file here).
Setting up the Notifications Provider
The Notifications Provider ensures the app listens for incoming notifications, as well as define the behaviour when a user interacts with the notification. You can see the full implementation of the provider here.
Consuming the Provider
The next step is to consume the provider. Providers are typically added to the root of the application, otherwise known as the layout file here. This implementation:
Wraps your application with the notification provider
Ensures the app starts listening for notifications on launch
Permission Request Hook
We also need to create a hook which handles requesting notification permissions from the user (this only happens once for iOS devices, you'll need to re-install the app to prompt the user again). Refer to the hook implementation here.
UI Integration and Device Token Registration
The index file for the app is where everything pieces together. This includes:
Using the permission hook to request notification access
Retrieve and store the device token and notification preference in Supabase
Provides a toggle UI element to enable/disable notifications
You can find the implementation of the client UI here.
Testing the Implementation
Follow these steps to test your implementation locally:
1. Local Testing with Supabase CLI
Run your edge function locally:
supabase functions serve notifications-push --no-verify-jwt
This command starts your Edge Function locally without JWT verification, which is useful for development but should not be used in production.
2. Trigger the Function with cURL
Once your function is running locally, you can trigger it using cURL:
curl -i --location --request POST 'http://localhost:54321/functions/v1/send-notifications'
3. Verify Notification Delivery
When testing with a physical device with notifications enabled, you should see the notification appear on the device. If notifications aren't delivered, check your function logs for errors.
4. Testing the Toggle Feature
An important aspect to test is the notification toggle functionality:
Toggle notifications off in your app's UI
Run the edge function again
Verify that no notification appears on your device
This confirms that your query is correctly filtering out devices where notifications have been disabled, respecting user preferences.
Next Steps
Now that you've built your basic push notification system, you can enhance it in several valuable ways:
Set up automated push notifications using Supabase's Edge Functions with cron jobs. This enables daily digests, weekly summaries, or time-sensitive campaigns without maintaining complex infrastructure.
Create a dedicated events table to track notification sends, deliveries, and opens
Target notifications based on user behavior or preferences
Add rate limiting to prevent notification fatigue
Set up logging and alerting for critical notification failures
These enhancements will transform your basic notification system into a sophisticated engagement tool that respects user preferences while maximising the impact of your communications.
Conclusion
By building a serverless push notification system with Supabase Edge Functions, you've created a cost-effective, maintainable, and scalable solution that gives you full control over your notification infrastructure. This approach eliminates third-party dependencies while maintaining high performance and reliability.
In our next technical guide, we'll explore implementing Android notifications using Firebase Cloud Messaging (FCM) within the same Supabase Edge Function architecture.
Want to skip the heavy lifting? Check out Launchtoday.dev - an Expo boilerplate designed to help you build apps faster. It’s packed with features such as authentication, payments, including push notifications, so you can focus on creating the best experience for your users without worrying about setup.