Mar 21, 2025
Articles
Goodbye App Center - Hello Github Actions + Fastlane 👋🏾

Paul Waweru
With Visual Studio App Center set to retire on March 31, 2025, many mobile app developers and startups are searching for alternative CI/CD solutions. The good news is that you don't need to invest in expensive services to fill the gap. This guide will walk you through creating your own robust pipeline using open-source tools like Fastlane and GitHub Actions.
This article focuses specifically on building a CI/CD pipeline for iOS applications (Android companion article coming soon). By the end, you'll understand how to automate version management, build processes, and TestFlight distribution using these powerful open-source tools.
Prerequisites
Before we begin constructing our pipeline, you should have:
Experience with Ruby: You'll be working with Ruby scripts to define workflow steps in Fastlane
Familiarity with GitHub Actions: This will be used to trigger and orchestrate the workflow
Access to an Apple Developer account: Required for code signing and TestFlight distribution
Basic understanding of iOS application structure: Including how Xcode projects are configured
If you'd prefer a ready-made solution that saves you time and effort, check out Launchtoday.dev - an Expo (and React Native CLI) starter kit with pre-configured automated pipelines using Fastlane and GitHub Actions, plus authentication, payments, and more features to accelerate your development.
Getting Started with Fastlane
Fastlane serves as the engine for your automation, handling mobile-specific tasks like code signing, version management and app store uploads. Let's set it up in your project:
Install Fastlane using Homebrew:
Set up Fastlane in your project directories:
Navigate to your iOS directory:
cd iosInitialise Fastlane:
fastlane initWhen prompted, choose option 4: "Manual setup - manually setup your project to automate your tasks"
This setup creates the basic Fastlane directory structure with a Fastfile where you'll define your automation lanes (think of lanes as specialised scripts for different tasks).
Setting Up GitHub Actions Workflow
After configuring Fastlane, you'll need to create a GitHub Actions workflow file that orchestrates your CI/CD pipeline:
Create a
.github/workflowsdirectory in your project root if it doesn't already exist:Create a new YAML file for your iOS pipeline (e.g.
ios-pipeline.yml) in this directory:
Understanding the Pipeline Architecture
A robust CI/CD pipeline consists of four key components that work together:

Setup Environment – Install dependencies, authenticate with Apple, configure credentials, and set up provisioning profiles
Update Build Number – Retrieve the latest build number from App Store Connect, increment it, and update project settings
Build App – Compile the iOS application, run tests, create an Xcode archive, and export the IPA file
Distribute App – Upload the built application to TestFlight or App Store
How GitHub Actions and Fastlane Work Together
Understanding the relationship between these two tools is essential for building an effective pipeline:
GitHub Actions orchestrates the overall process, determining when builds should run and setting up the environment
Fastlane handles the specific steps for code signing, installing dependencies, building and distributing the app
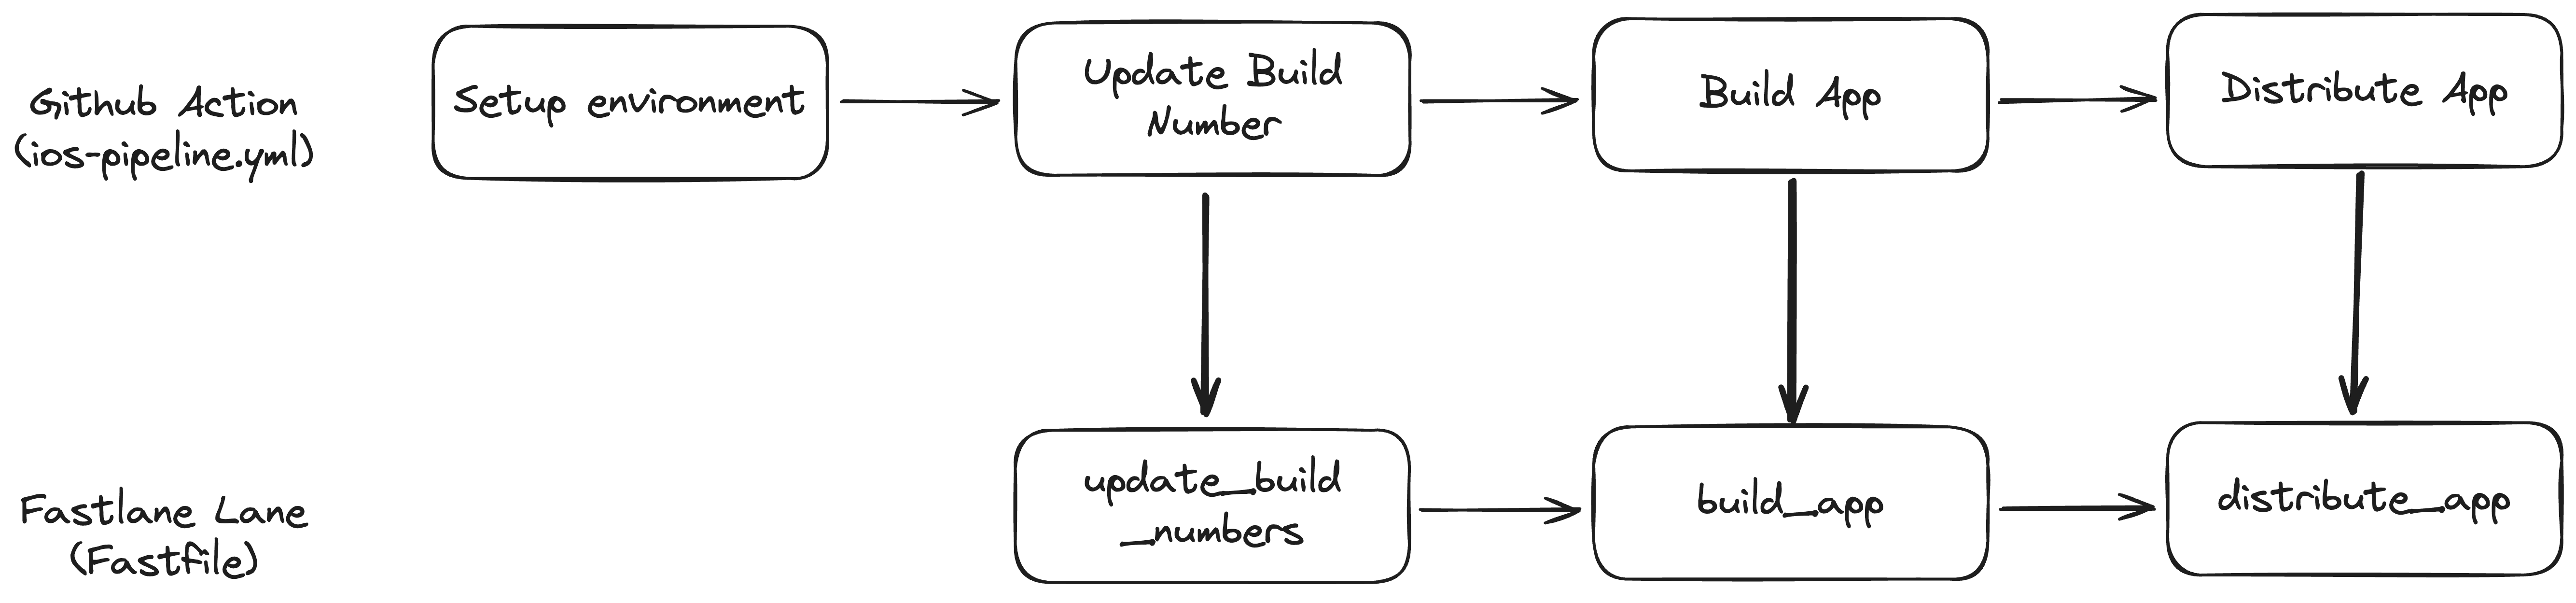
GitHub Actions triggers Fastlane lanes through commands like bundle exec fastlane <lane>. The diagram below shows this relationship:
Key Fastlane Components
1. Automating Version Management
Every iOS build submitted to App Store Connect requires a unique version and build number combination. Managing this manually across environments becomes tedious and error-prone, especially as your release cadence increases.
A robust version management approach should:
Retrieve current versions from both App Store Connect API (TestFlight) and your local Info.plist
Intelligently increment versions based on context:
For all builds: Calculate the next build number by taking the maximum between local and TestFlight values, then incrementing
For production releases: Also increment the version number (e.g., 5.0 → 5.1)
For staging builds: Update only the build number while keeping the version consistent
Update configuration in Info.plist and Xcode project settings to reflect the new values
This ensures every build has a unique identity while maintaining a logical versioning pattern between environments. Here's an example of how this might look in your Fastfile:
lane :update_build_number do

 plist_file_path = "MyApp/Info.plist"
 # Get current build number from TestFlight

 latest_build = latest_testflight_build_number(
   app_identifier: "com.myapp.identifier"
 )

 # Get current local build number
 current_build_number = get_info_plist_value(
   path: plist_file_path,
   key: "CFBundleVersion"
 )

 # Calculate next build number
 next_build_number = [current_build_number.to_i, latest_build.to_i].max + 1

 # Update Info.plist with new build number
 set_info_plist_value(
   path: plist_file_path,
   key: "CFBundleVersion",
   value: next_build_number.to_s
 )

 # Update project file build number
 increment_build_number(
   build_number: next_build_number.to_s,
   xcodeproj: "MyApp.xcodeproj"
 )

 # For production builds, update version number
 if ENV["PRODUCTION"] == "true"
   current_version = get_info_plist_value(
     path: plist_file_path,
     key: "CFBundleShortVersionString"
   )

   # Increment last part of version number (e.g., 1.2.3 → 1.2.4)
   version_parts = current_version.split('.')
   version_parts[-1] = (version_parts[-1].to_i + 1).to_s
   next_version = version_parts.join('.')

   # Update version in plist and project
   set_info_plist_value(
     path: plist_file_path,
     key: "CFBundleShortVersionString",
     value: next_version
   )

   increment_version_number(
     version_number: next_version,
     xcodeproj: "MyApp.xcodeproj"
   )
 end
end
2. Building for Distribution
Building for distribution involves several moving parts that need to work together seamlessly. Let's break it down:
Managing Dependencies
When setting up your dependency management, you'll want to utilise the cocoapods action that runs pod install for the associated project. This will install the dependencies required for your iOS app:
cocoapods(
  podfile: File.expand_path("../Podfile", __dir__
Setting Up a Secure Signing Environment
For CI environments, you'll need a secure signing environment. Create an isolated keychain with the right security settings to prevent timeouts during those longer builds:
if ENV['CI']
  keychain_name = "ios-build.keychain"
  keychain_password = "temp-password"

  create_keychain(
    name: keychain_name,
    password: keychain_password,
    default_keychain: true,
    unlock: true,
    timeout: 3600
  )
end
Managing Provisioning Profiles
The match action is your friend for provisioning profile management. It retrieves profiles from a private Git repository and handles authentication with the App Store Connect API:
match(
  type: "appstore",
  app_identifier: "com.myapp.identifier",
  git_url: "https://github.com/myapp/certificates",
  readonly: true,
  keychain_name: ENV['CI'] ? "ios-build.keychain" : nil,
  keychain_password: ENV['CI'] ? "temp-password" : nil
Building the App
The final step is to compile and build the app for distribution. Fastlane provides the build_app action for building and packaging your iOS app and generates a .ipa file for distribution:
# Build the app
build_app(
  workspace: "MyApp.xcworkspace",
  scheme: "MyApp",
  export_method: "app-store",
  clean: true,
  output_directory: "build",
  include_bitcode: false,
  configuration: "Release",
  xcargs: {
    "DEVELOPMENT_TEAM": "ABC123XYZ",
    "CODE_SIGN_STYLE": "Manual",
    "PRODUCT_BUNDLE_IDENTIFIER": "com.myapp.identifier"
Here is a combined Fastlane lane for building the app:
lane :build_app do
  # Install CocoaPods dependencies
  cocoapods(
    clean_install: false,
    try_repo_update_on_error: true,
    podfile: File.expand_path("../Podfile", __dir__)
  )

  # Setup keychain for CI environment
  if ENV['CI']
    keychain_name = "ios-build.keychain"
    keychain_password = "temp-password"

    create_keychain(
      name: keychain_name,
      password: keychain_password,
      default_keychain: true,
      unlock: true,
      timeout: 3600
    )
  end

  # Fetch provisioning profiles
  match(
    type: "appstore",
    app_identifier: "com.myapp.identifier",
    git_url: "https://github.com/myapp/certificates",
    readonly: true,
    keychain_name: ENV['CI'] ? "ios-build.keychain" : nil,
    keychain_password: ENV['CI'] ? "temp-password" : nil
  )

  # Build the app
  build_app(
    workspace: "MyApp.xcworkspace",
    scheme: "MyApp",
    export_method: "app-store",
    clean: true,
    output_directory: "build",
    include_bitcode: false,
    configuration: "Release",
    xcargs: {
      "DEVELOPMENT_TEAM": "ABC123XYZ",
      "CODE_SIGN_STYLE": "Manual",
      "PRODUCT_BUNDLE_IDENTIFIER": "com.myapp.identifier"
    }
  )
end
3. Automated TestFlight Distribution
Getting your app to testers should be smooth and painless. Fortunately, Fastlane exposes the pilot action for uploading your app to TestFlight.
Release notes make a big difference to your testing team. Set up your pipeline to automatically extract commit messages between the last deployment and current build, formatting them as an easy-to-read changelog.
When configuring TestFlight uploads, handle authentication with App Store Connect API keys, target the correct app with proper team identifiers, and set appropriate tester distribution settings. Don't forget to include the necessary review information for Apple's team. Below is an example Fastlane lane combining generating release notes and uploading the app to TestFlight:
lane :distribute_app do
 # Get commit messages for changelog
 current_branch = `git rev-parse --abbrev-ref HEAD`.strip
 last_deployed_commit = `git rev-parse origin/#{current_branch}`.strip
 commit_messages = `git log #{last_deployed_commit}..HEAD --pretty=format:"- %s"`.strip

 # Default message if no new commits
 commit_messages = "New build" if commit_messages.empty?

 # Upload to TestFlight
 pilot(
   app_identifier: "com.myapp.identifier",
   ipa: "build/MyApp.ipa",
   skip_waiting_for_build_processing: true,
   skip_submission: false,
   distribute_external: false,
   notify_external_testers: false,
   uses_non_exempt_encryption: false,
   changelog: commit_messages,
   beta_app_review_info: {
     contact_email: "developer@example.com",
     contact_first_name: "App",
     contact_last_name: "Developer",
     contact_phone: "555-123-4567",
     demo_account_required: false
   }
 )
end
Configuring your GitHub Actions pipeline
Now let's connect everything by setting up the GitHub Actions workflow that will trigger our Fastlane lanes. Here's a quick reminder of the workflow (we are now implementing the top row titled GitHub Action):
Setup Environment
This job prepares your build environment by defining software versions and implementing caching strategies. In your GitHub Action workflow file we created earlier (with the .yaml extension), you'll want to add your first job:
setup-environment:
  name: Setup Environment
  runs-on: macos-14
  outputs:
    ruby-version: '3.2'
    node-version: '18'
    cache-key: ${{ steps.cache-key.outputs.key }}
  steps:
    - name: Git - Checkout code ⬇️
      uses: actions/checkout@v3

    - name: Generate cache key
      id: cache-key
      run: |
        # Generate cache keys based on dependency lockfiles
        # This helps optimize CI performance
Update Version and Build Number
This job runs the Fastlane lane we created earlier to manage app versioning:
update-build-number:
  name: Update Build Number
  needs: setup-environment
  runs-on: macos-14
  environment: staging
  steps:
    - name: Git - Checkout code ⬇️
      uses: actions/checkout@v3

    - name: Install Ruby & Bundler
      uses: ruby/setup-ruby@v1

    - name: iOS - Update Build Number
      run: |
        if [[ "${{ github.ref }}" == "refs/heads/main" ]]; then
          # Production mode - increment version and build number
          cd ios && bundle exec fastlane ios update_build_number production:true
        else
          # Staging mode - only increment build number
          cd ios && bundle exec fastlane ios update_build_number
        fi
Build App
This job handles dependency installation and runs the app building Fastlane lane:
build-app:
  name: Build App
  needs: [setup-environment, update-version]
  runs-on: macos-14
  environment: staging
  steps:
    # Setup steps omitted for brevity
    - name: iOS - Build App
      run: |
        cd ios && bundle exec fastlane ios build_app
      env:
        REACT_NATIVE_PATH: ${{ github.workspace }}/node_modules/react-native
        NODE_BINARY
Distribute App
Finally, this job uploads your built app to TestFlight:
distribute-app:
  name: Distribute App
  needs: [setup-environment, build-app]
  runs-on: macos-14
  environment: ${{ github.ref == 'refs/heads/main' && 'production' || 'staging' }}
  steps:
    # Setup steps omitted for brevity
    - name: iOS - Distribute App
      run: |
        cd ios && bundle exec fastlane ios distribute_app
Each of these jobs in the GitHub Actions workflow triggers specific Fastlane lanes that handle the technical implementation. This separation of concerns gives you the flexibility to test Fastlane lanes locally while having GitHub Actions orchestrate the overall process.
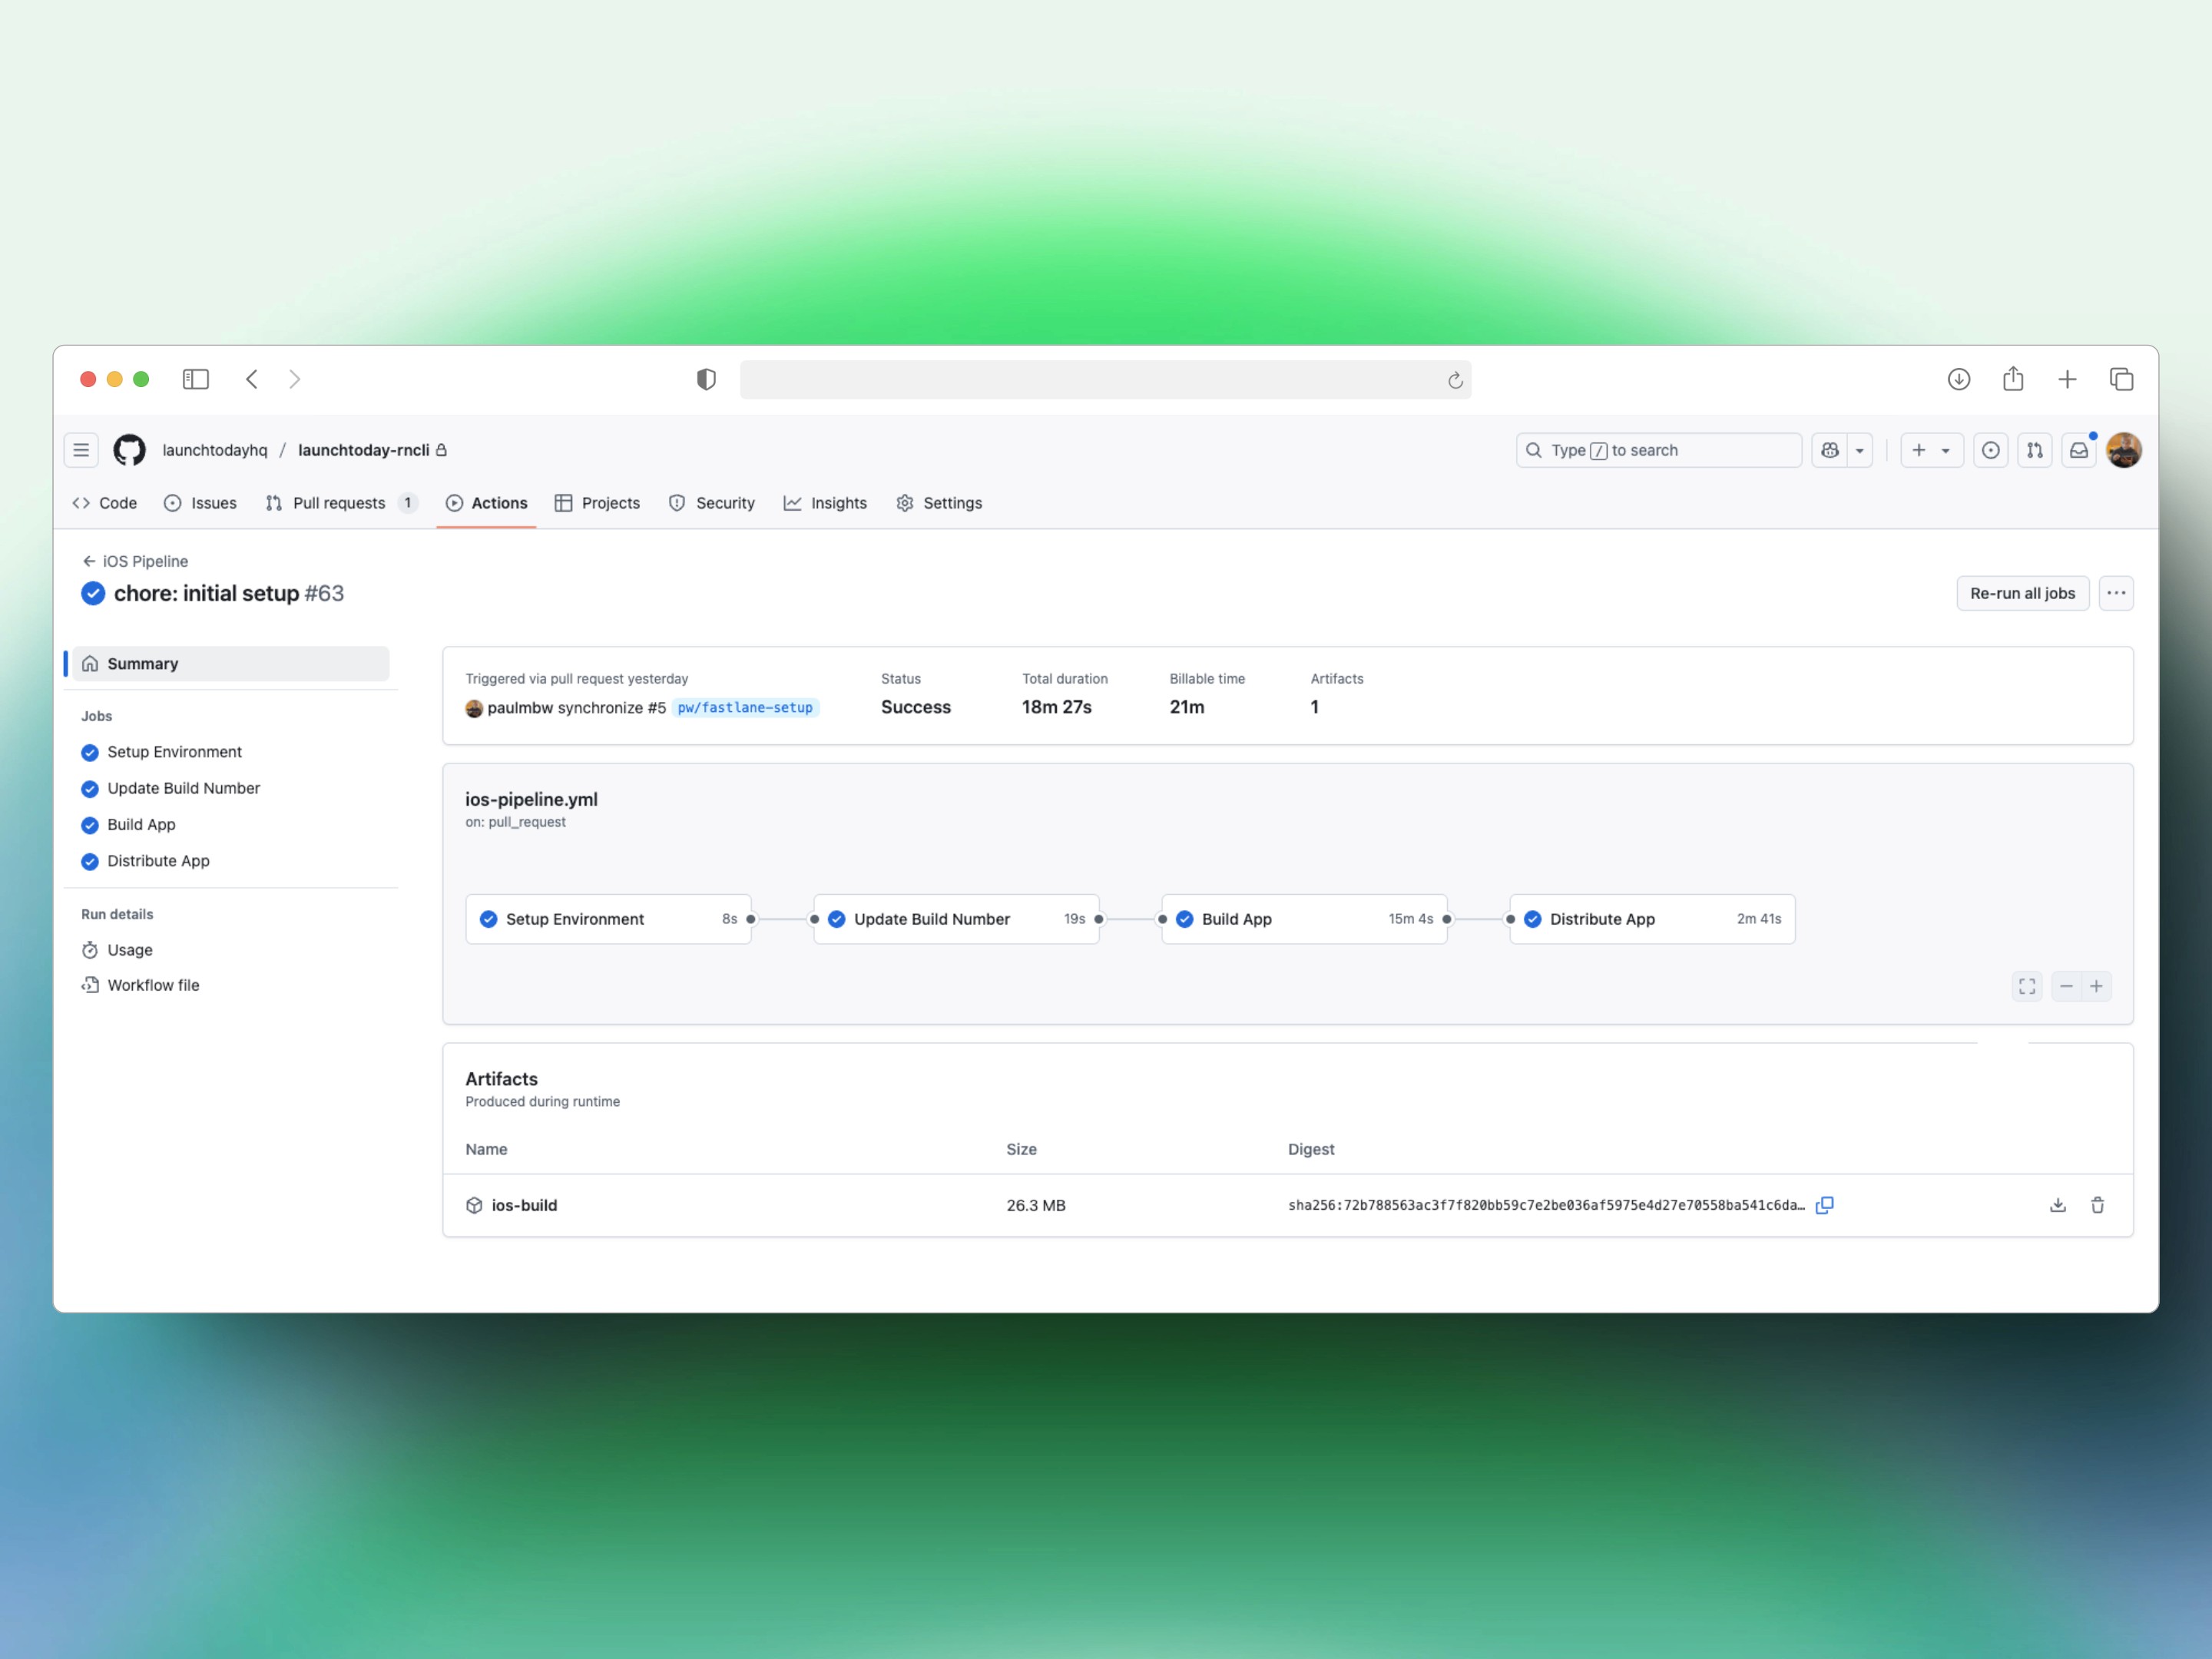
As a result, you should have an iOS pipeline that automates the build and distribution flow. As shown below, builds typically take 15 to 30 minutes to complete, depending on the size and complexity of your app. You will also have access to the artifacts which is the .ipa file - the compiled iOS app.
Important Considerations
While we've covered the core pipeline components, a production-ready setup requires attention to these additional areas:
Secrets Management
Secure storage of sensitive information is crucial. Use GitHub Actions' secrets feature to safely store:
Apple API keys
Certificate passwords
Repository access tokens
Other credentials
This approach keeps sensitive information out of your codebase while making it available to your pipeline when needed.
Error Handling and Notifications
A failed build that goes unnoticed can disrupt your entire release schedule. Implement robust error handling and notification systems to:
Detect build and distribution failures quickly
Send alerts to appropriate team members through Slack, Teams, or email
Provide detailed error information to speed up troubleshooting
Scaling for Larger Teams
As your team grows, consider implementing:
Parallel workflows to run concurrent builds for different environments
Matrix builds to test across multiple configurations simultaneously
Self-hosted runners for greater control and potential cost savings
Release Coordination
Align your CI/CD pipeline with your broader release process:
Coordinate TestFlight review timing with your release calendar
Implement release branches with appropriate triggers
Consider automated changelog generation based on commit messages or pull request descriptions
Next Steps and Enhancements
The pipeline we've outlined provides a solid foundation, but you can enhance it further with these additions:
Integrated messaging with Slack or Teams notifications to keep your team informed of build status
Expanded testing to run automated tests and distribute to TestFlight only when all tests pass
Semantic versioning through branch naming conventions (e.g.,
release/v2.0.0)Self-hosted GitHub Actions runners for greater control and potential cost/speed optimizations
Automated screenshot generation for App Store submissions
Conclusion
Building your own CI/CD pipeline with Fastlane and GitHub Actions requires some initial effort, but the benefits are significant: greater control, reduced costs, and a workflow precisely tailored to your team's needs. This approach can successfully replace App Center while providing you with more flexibility and scalability for the future.
For those who prefer to skip the setup process and get straight to development, consider Launchtoday.dev - an Expo and React Native starter kit with pre-configured pipelines already set up, along with authentication, payments, and other essential features to accelerate your mobile app development.
By investing time in understanding and setting up these powerful open-source tools, you're not just replacing App Center—you're potentially upgrading your entire development workflow for better efficiency and reliability.
With Visual Studio App Center set to retire on March 31, 2025, many mobile app developers and startups are searching for alternative CI/CD solutions. The good news is that you don't need to invest in expensive services to fill the gap. This guide will walk you through creating your own robust pipeline using open-source tools like Fastlane and GitHub Actions.
This article focuses specifically on building a CI/CD pipeline for iOS applications (Android companion article coming soon). By the end, you'll understand how to automate version management, build processes, and TestFlight distribution using these powerful open-source tools.
Prerequisites
Before we begin constructing our pipeline, you should have:
Experience with Ruby: You'll be working with Ruby scripts to define workflow steps in Fastlane
Familiarity with GitHub Actions: This will be used to trigger and orchestrate the workflow
Access to an Apple Developer account: Required for code signing and TestFlight distribution
Basic understanding of iOS application structure: Including how Xcode projects are configured
If you'd prefer a ready-made solution that saves you time and effort, check out Launchtoday.dev - an Expo (and React Native CLI) starter kit with pre-configured automated pipelines using Fastlane and GitHub Actions, plus authentication, payments, and more features to accelerate your development.
Getting Started with Fastlane
Fastlane serves as the engine for your automation, handling mobile-specific tasks like code signing, version management and app store uploads. Let's set it up in your project:
Install Fastlane using Homebrew:
Set up Fastlane in your project directories:
Navigate to your iOS directory:
cd iosInitialise Fastlane:
fastlane initWhen prompted, choose option 4: "Manual setup - manually setup your project to automate your tasks"
This setup creates the basic Fastlane directory structure with a Fastfile where you'll define your automation lanes (think of lanes as specialised scripts for different tasks).
Setting Up GitHub Actions Workflow
After configuring Fastlane, you'll need to create a GitHub Actions workflow file that orchestrates your CI/CD pipeline:
Create a
.github/workflowsdirectory in your project root if it doesn't already exist:Create a new YAML file for your iOS pipeline (e.g.
ios-pipeline.yml) in this directory:
Understanding the Pipeline Architecture
A robust CI/CD pipeline consists of four key components that work together:
Setup Environment – Install dependencies, authenticate with Apple, configure credentials, and set up provisioning profiles
Update Build Number – Retrieve the latest build number from App Store Connect, increment it, and update project settings
Build App – Compile the iOS application, run tests, create an Xcode archive, and export the IPA file
Distribute App – Upload the built application to TestFlight or App Store
How GitHub Actions and Fastlane Work Together
Understanding the relationship between these two tools is essential for building an effective pipeline:
GitHub Actions orchestrates the overall process, determining when builds should run and setting up the environment
Fastlane handles the specific steps for code signing, installing dependencies, building and distributing the app
GitHub Actions triggers Fastlane lanes through commands like bundle exec fastlane <lane>. The diagram below shows this relationship:
Key Fastlane Components
1. Automating Version Management
Every iOS build submitted to App Store Connect requires a unique version and build number combination. Managing this manually across environments becomes tedious and error-prone, especially as your release cadence increases.
A robust version management approach should:
Retrieve current versions from both App Store Connect API (TestFlight) and your local Info.plist
Intelligently increment versions based on context:
For all builds: Calculate the next build number by taking the maximum between local and TestFlight values, then incrementing
For production releases: Also increment the version number (e.g., 5.0 → 5.1)
For staging builds: Update only the build number while keeping the version consistent
Update configuration in Info.plist and Xcode project settings to reflect the new values
This ensures every build has a unique identity while maintaining a logical versioning pattern between environments. Here's an example of how this might look in your Fastfile:
lane :update_build_number do

 plist_file_path = "MyApp/Info.plist"
 # Get current build number from TestFlight

 latest_build = latest_testflight_build_number(
   app_identifier: "com.myapp.identifier"
 )

 # Get current local build number
 current_build_number = get_info_plist_value(
   path: plist_file_path,
   key: "CFBundleVersion"
 )

 # Calculate next build number
 next_build_number = [current_build_number.to_i, latest_build.to_i].max + 1

 # Update Info.plist with new build number
 set_info_plist_value(
   path: plist_file_path,
   key: "CFBundleVersion",
   value: next_build_number.to_s
 )

 # Update project file build number
 increment_build_number(
   build_number: next_build_number.to_s,
   xcodeproj: "MyApp.xcodeproj"
 )

 # For production builds, update version number
 if ENV["PRODUCTION"] == "true"
   current_version = get_info_plist_value(
     path: plist_file_path,
     key: "CFBundleShortVersionString"
   )

   # Increment last part of version number (e.g., 1.2.3 → 1.2.4)
   version_parts = current_version.split('.')
   version_parts[-1] = (version_parts[-1].to_i + 1).to_s
   next_version = version_parts.join('.')

   # Update version in plist and project
   set_info_plist_value(
     path: plist_file_path,
     key: "CFBundleShortVersionString",
     value: next_version
   )

   increment_version_number(
     version_number: next_version,
     xcodeproj: "MyApp.xcodeproj"
   )
 end
end
2. Building for Distribution
Building for distribution involves several moving parts that need to work together seamlessly. Let's break it down:
Managing Dependencies
When setting up your dependency management, you'll want to utilise the cocoapods action that runs pod install for the associated project. This will install the dependencies required for your iOS app:
cocoapods(
  podfile: File.expand_path("../Podfile", __dir__
Setting Up a Secure Signing Environment
For CI environments, you'll need a secure signing environment. Create an isolated keychain with the right security settings to prevent timeouts during those longer builds:
if ENV['CI']
  keychain_name = "ios-build.keychain"
  keychain_password = "temp-password"

  create_keychain(
    name: keychain_name,
    password: keychain_password,
    default_keychain: true,
    unlock: true,
    timeout: 3600
  )
end
Managing Provisioning Profiles
The match action is your friend for provisioning profile management. It retrieves profiles from a private Git repository and handles authentication with the App Store Connect API:
match(
  type: "appstore",
  app_identifier: "com.myapp.identifier",
  git_url: "https://github.com/myapp/certificates",
  readonly: true,
  keychain_name: ENV['CI'] ? "ios-build.keychain" : nil,
  keychain_password: ENV['CI'] ? "temp-password" : nil
Building the App
The final step is to compile and build the app for distribution. Fastlane provides the build_app action for building and packaging your iOS app and generates a .ipa file for distribution:
# Build the app
build_app(
  workspace: "MyApp.xcworkspace",
  scheme: "MyApp",
  export_method: "app-store",
  clean: true,
  output_directory: "build",
  include_bitcode: false,
  configuration: "Release",
  xcargs: {
    "DEVELOPMENT_TEAM": "ABC123XYZ",
    "CODE_SIGN_STYLE": "Manual",
    "PRODUCT_BUNDLE_IDENTIFIER": "com.myapp.identifier"
Here is a combined Fastlane lane for building the app:
lane :build_app do
  # Install CocoaPods dependencies
  cocoapods(
    clean_install: false,
    try_repo_update_on_error: true,
    podfile: File.expand_path("../Podfile", __dir__)
  )

  # Setup keychain for CI environment
  if ENV['CI']
    keychain_name = "ios-build.keychain"
    keychain_password = "temp-password"

    create_keychain(
      name: keychain_name,
      password: keychain_password,
      default_keychain: true,
      unlock: true,
      timeout: 3600
    )
  end

  # Fetch provisioning profiles
  match(
    type: "appstore",
    app_identifier: "com.myapp.identifier",
    git_url: "https://github.com/myapp/certificates",
    readonly: true,
    keychain_name: ENV['CI'] ? "ios-build.keychain" : nil,
    keychain_password: ENV['CI'] ? "temp-password" : nil
  )

  # Build the app
  build_app(
    workspace: "MyApp.xcworkspace",
    scheme: "MyApp",
    export_method: "app-store",
    clean: true,
    output_directory: "build",
    include_bitcode: false,
    configuration: "Release",
    xcargs: {
      "DEVELOPMENT_TEAM": "ABC123XYZ",
      "CODE_SIGN_STYLE": "Manual",
      "PRODUCT_BUNDLE_IDENTIFIER": "com.myapp.identifier"
    }
  )
end
3. Automated TestFlight Distribution
Getting your app to testers should be smooth and painless. Fortunately, Fastlane exposes the pilot action for uploading your app to TestFlight.
Release notes make a big difference to your testing team. Set up your pipeline to automatically extract commit messages between the last deployment and current build, formatting them as an easy-to-read changelog.
When configuring TestFlight uploads, handle authentication with App Store Connect API keys, target the correct app with proper team identifiers, and set appropriate tester distribution settings. Don't forget to include the necessary review information for Apple's team. Below is an example Fastlane lane combining generating release notes and uploading the app to TestFlight:
lane :distribute_app do
 # Get commit messages for changelog
 current_branch = `git rev-parse --abbrev-ref HEAD`.strip
 last_deployed_commit = `git rev-parse origin/#{current_branch}`.strip
 commit_messages = `git log #{last_deployed_commit}..HEAD --pretty=format:"- %s"`.strip

 # Default message if no new commits
 commit_messages = "New build" if commit_messages.empty?

 # Upload to TestFlight
 pilot(
   app_identifier: "com.myapp.identifier",
   ipa: "build/MyApp.ipa",
   skip_waiting_for_build_processing: true,
   skip_submission: false,
   distribute_external: false,
   notify_external_testers: false,
   uses_non_exempt_encryption: false,
   changelog: commit_messages,
   beta_app_review_info: {
     contact_email: "developer@example.com",
     contact_first_name: "App",
     contact_last_name: "Developer",
     contact_phone: "555-123-4567",
     demo_account_required: false
   }
 )
end
Configuring your GitHub Actions pipeline
Now let's connect everything by setting up the GitHub Actions workflow that will trigger our Fastlane lanes. Here's a quick reminder of the workflow (we are now implementing the top row titled GitHub Action):
Setup Environment
This job prepares your build environment by defining software versions and implementing caching strategies. In your GitHub Action workflow file we created earlier (with the .yaml extension), you'll want to add your first job:
setup-environment:
  name: Setup Environment
  runs-on: macos-14
  outputs:
    ruby-version: '3.2'
    node-version: '18'
    cache-key: ${{ steps.cache-key.outputs.key }}
  steps:
    - name: Git - Checkout code ⬇️
      uses: actions/checkout@v3

    - name: Generate cache key
      id: cache-key
      run: |
        # Generate cache keys based on dependency lockfiles
        # This helps optimize CI performance
Update Version and Build Number
This job runs the Fastlane lane we created earlier to manage app versioning:
update-build-number:
  name: Update Build Number
  needs: setup-environment
  runs-on: macos-14
  environment: staging
  steps:
    - name: Git - Checkout code ⬇️
      uses: actions/checkout@v3

    - name: Install Ruby & Bundler
      uses: ruby/setup-ruby@v1

    - name: iOS - Update Build Number
      run: |
        if [[ "${{ github.ref }}" == "refs/heads/main" ]]; then
          # Production mode - increment version and build number
          cd ios && bundle exec fastlane ios update_build_number production:true
        else
          # Staging mode - only increment build number
          cd ios && bundle exec fastlane ios update_build_number
        fi
Build App
This job handles dependency installation and runs the app building Fastlane lane:
build-app:
  name: Build App
  needs: [setup-environment, update-version]
  runs-on: macos-14
  environment: staging
  steps:
    # Setup steps omitted for brevity
    - name: iOS - Build App
      run: |
        cd ios && bundle exec fastlane ios build_app
      env:
        REACT_NATIVE_PATH: ${{ github.workspace }}/node_modules/react-native
        NODE_BINARY
Distribute App
Finally, this job uploads your built app to TestFlight:
distribute-app:
  name: Distribute App
  needs: [setup-environment, build-app]
  runs-on: macos-14
  environment: ${{ github.ref == 'refs/heads/main' && 'production' || 'staging' }}
  steps:
    # Setup steps omitted for brevity
    - name: iOS - Distribute App
      run: |
        cd ios && bundle exec fastlane ios distribute_app
Each of these jobs in the GitHub Actions workflow triggers specific Fastlane lanes that handle the technical implementation. This separation of concerns gives you the flexibility to test Fastlane lanes locally while having GitHub Actions orchestrate the overall process.
As a result, you should have an iOS pipeline that automates the build and distribution flow. As shown below, builds typically take 15 to 30 minutes to complete, depending on the size and complexity of your app. You will also have access to the artifacts which is the .ipa file - the compiled iOS app.
Important Considerations
While we've covered the core pipeline components, a production-ready setup requires attention to these additional areas:
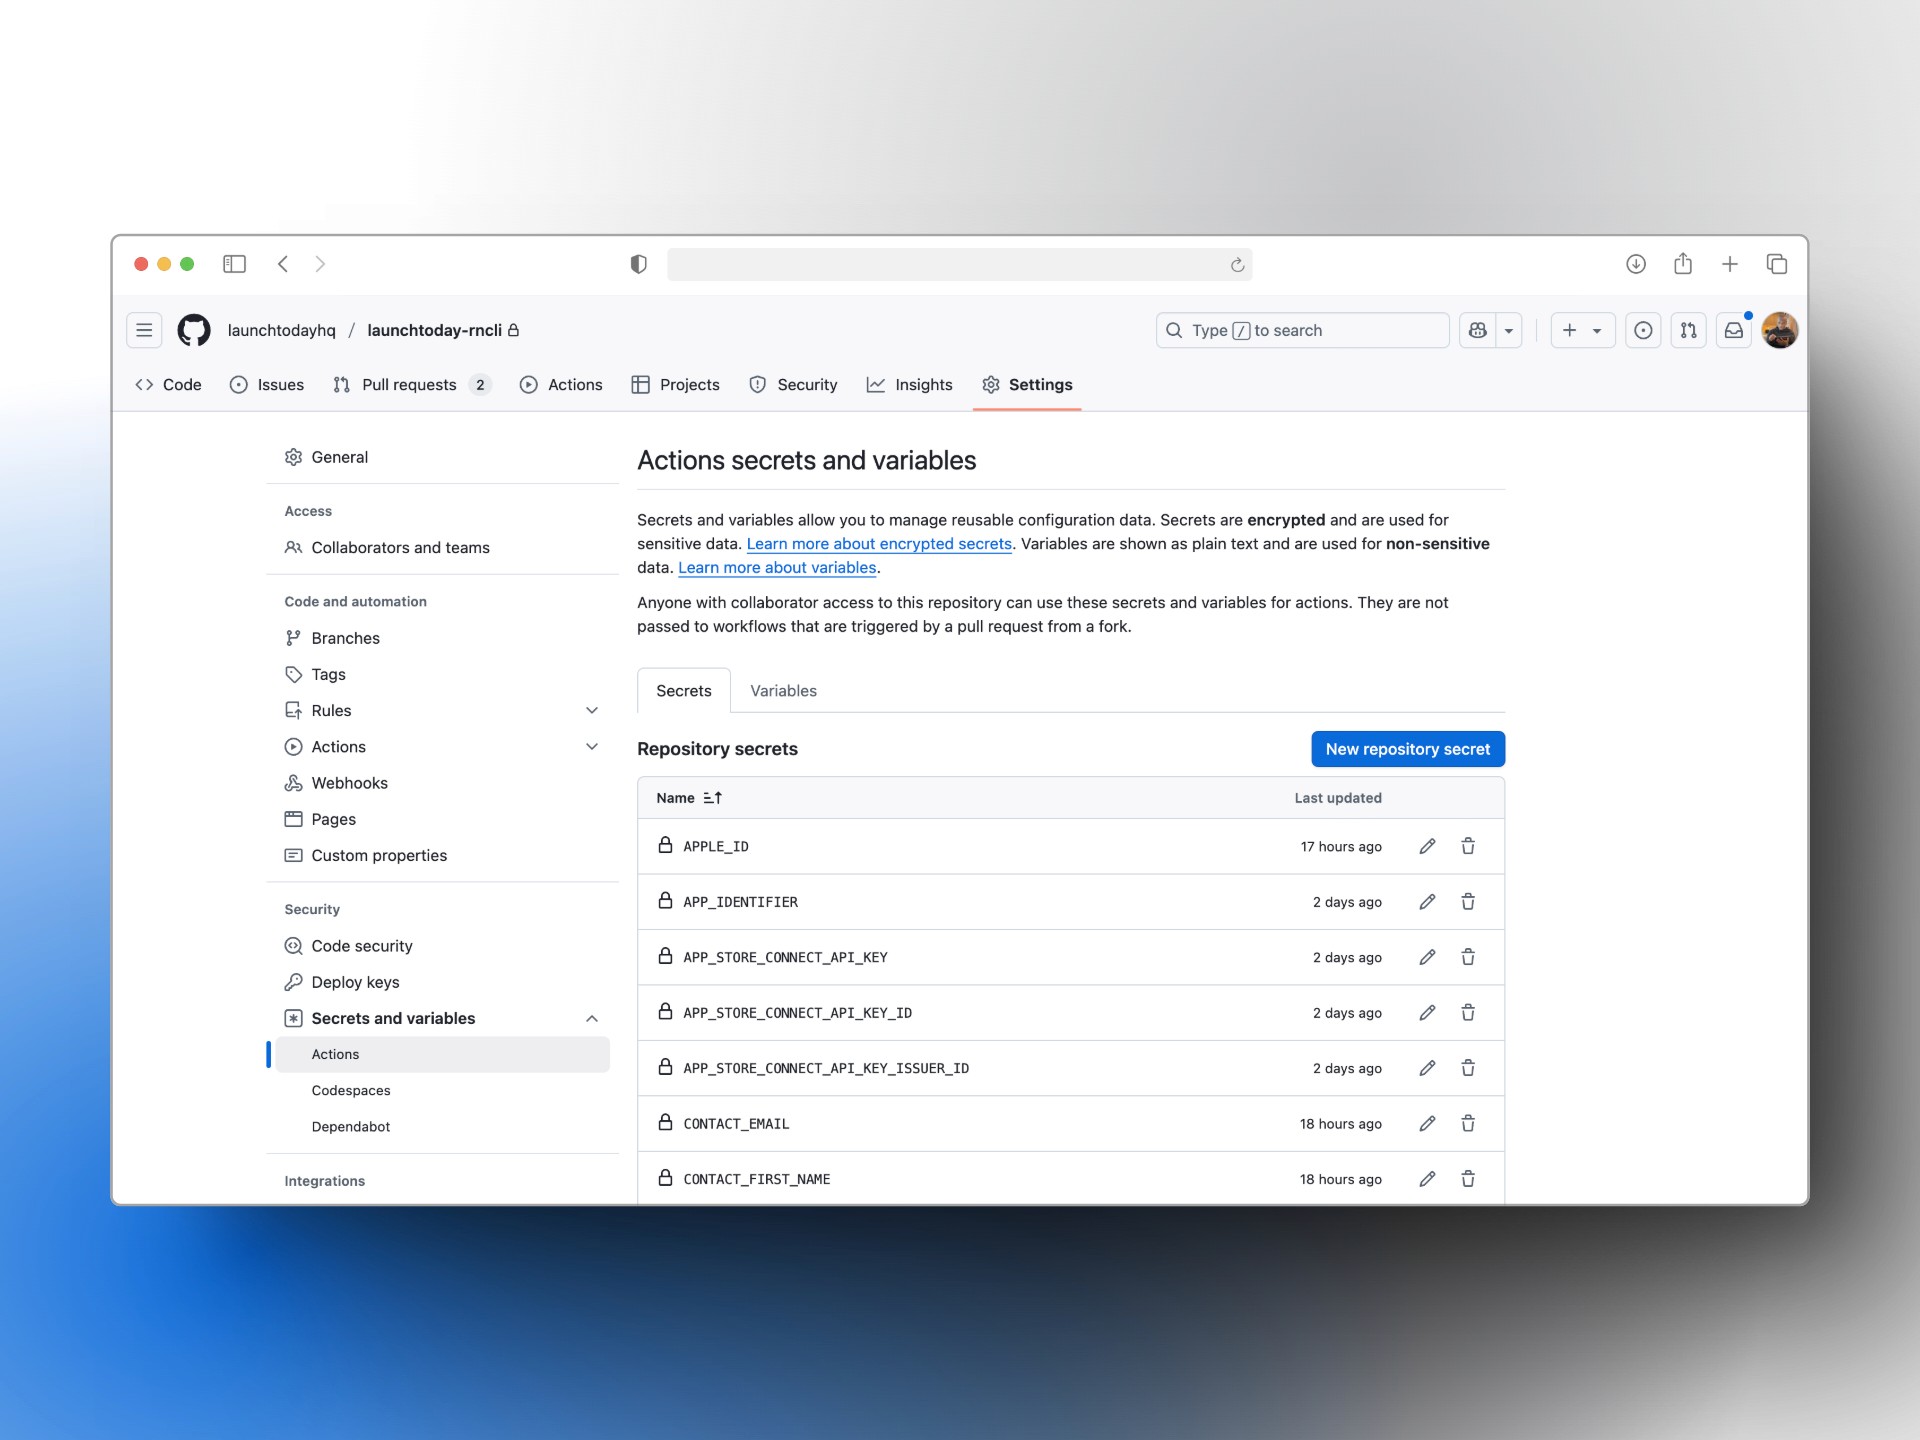
Secrets Management
Secure storage of sensitive information is crucial. Use GitHub Actions' secrets feature to safely store:
Apple API keys
Certificate passwords
Repository access tokens
Other credentials
This approach keeps sensitive information out of your codebase while making it available to your pipeline when needed.
Error Handling and Notifications
A failed build that goes unnoticed can disrupt your entire release schedule. Implement robust error handling and notification systems to:
Detect build and distribution failures quickly
Send alerts to appropriate team members through Slack, Teams, or email
Provide detailed error information to speed up troubleshooting
Scaling for Larger Teams
As your team grows, consider implementing:
Parallel workflows to run concurrent builds for different environments
Matrix builds to test across multiple configurations simultaneously
Self-hosted runners for greater control and potential cost savings
Release Coordination
Align your CI/CD pipeline with your broader release process:
Coordinate TestFlight review timing with your release calendar
Implement release branches with appropriate triggers
Consider automated changelog generation based on commit messages or pull request descriptions
Next Steps and Enhancements
The pipeline we've outlined provides a solid foundation, but you can enhance it further with these additions:
Integrated messaging with Slack or Teams notifications to keep your team informed of build status
Expanded testing to run automated tests and distribute to TestFlight only when all tests pass
Semantic versioning through branch naming conventions (e.g.,
release/v2.0.0)Self-hosted GitHub Actions runners for greater control and potential cost/speed optimizations
Automated screenshot generation for App Store submissions
Conclusion
Building your own CI/CD pipeline with Fastlane and GitHub Actions requires some initial effort, but the benefits are significant: greater control, reduced costs, and a workflow precisely tailored to your team's needs. This approach can successfully replace App Center while providing you with more flexibility and scalability for the future.
For those who prefer to skip the setup process and get straight to development, consider Launchtoday.dev - an Expo and React Native starter kit with pre-configured pipelines already set up, along with authentication, payments, and other essential features to accelerate your mobile app development.
By investing time in understanding and setting up these powerful open-source tools, you're not just replacing App Center—you're potentially upgrading your entire development workflow for better efficiency and reliability.