Mar 2, 2025
Articles
Adding multi-language support to your Expo app - a complete guide

Paul Waweru

Want to make your app accessible to a wider audience? Supporting multiple languages is key, and it's easier than you might think. In this guide, we’ll walk you through setting up i18next with expo-localization to create a flexible translation system in your Expo app. Ready to dive in? Let’s go!
If you would like to skip straight to the code, you can find a link to the project here.
Prerequisites
This tutorial is built using the Expo framework, so you should be familiar with how Expo works.
Setup and Installation
First off, if you don’t have an Expo project set up yet, do that using:
Once that’s done, it's time to install the packages you’ll need:
npx expo install expo-localization react-i18next i18next @react-native-async-storage/async-storage
That’s it for the setup. Alternatively, you can see this commit if you’d like to jump straight into this section. Here is a summary of the dependencies and what they do:
expo-localization- detects and retrieves the user’s device locale settings.i18nextis the core internationalisation engine that manages the translation logic and data.react-i18nextconnects i18next with React, providing components and hooks to easily implement translations within your React application.
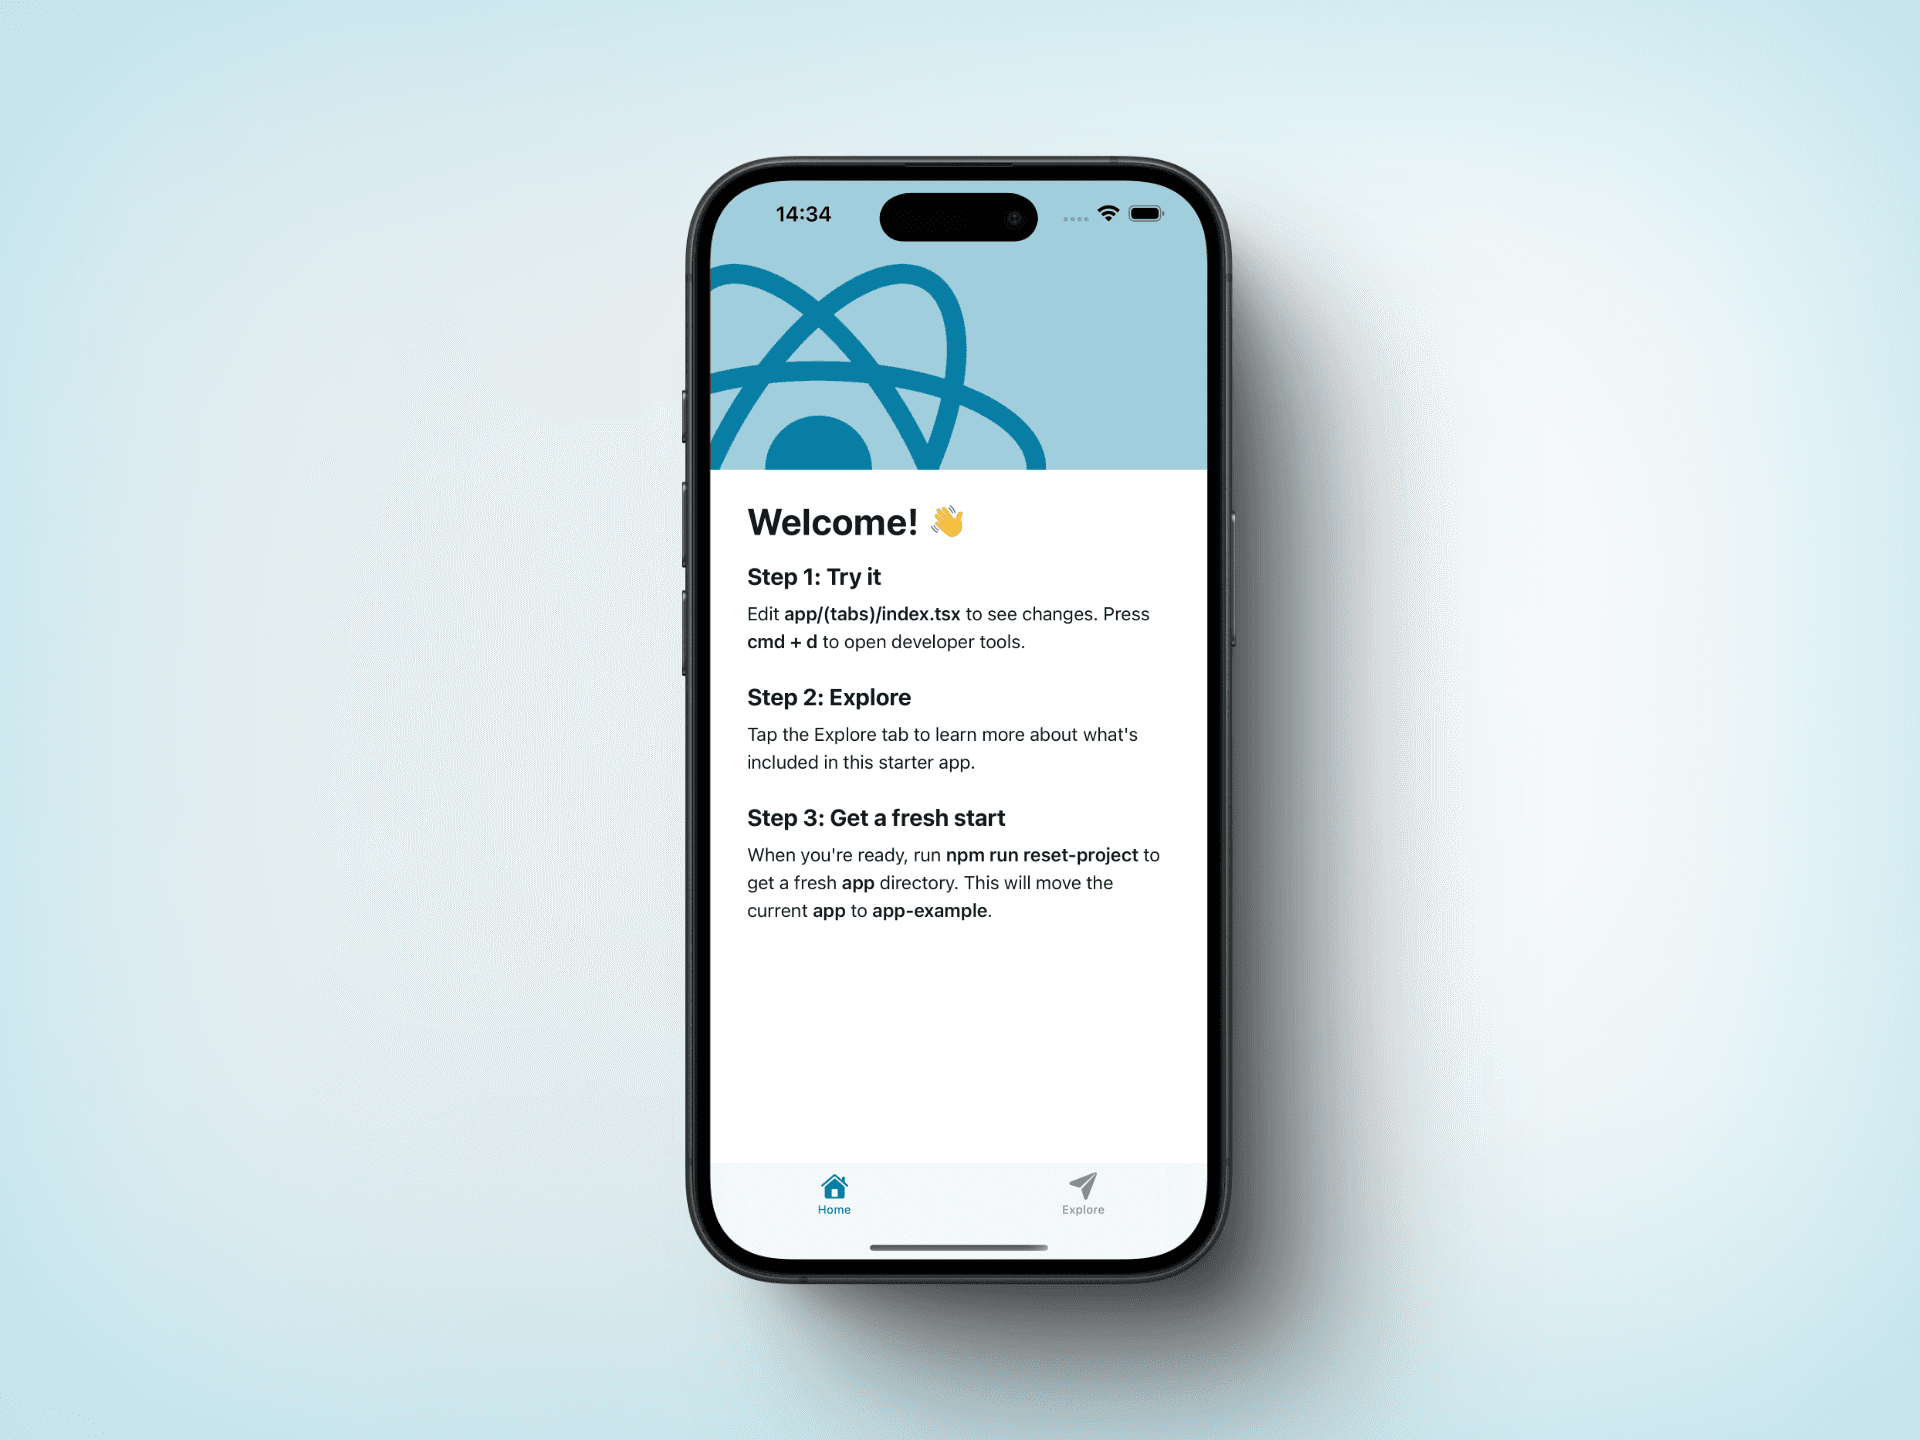
Once all the dependencies have been installed, run the app on your simulator. You can use the following commands in the to view available iOS simulators and boot your preferred device (you can also run the app on Android):
If you have a specific iPhone version, such as the iPhone 16 Plus, you can also run:
When the app is running, it should appear as follows:
Project Structure
Next, create a well-organised structure for your translations. In this example, we support English (US), Korean, and Arabic (SA). You can run the following command to create the folders and files (or see this commit):
mkdir -p src/i18n/locales/{en-US,es-ES,ko-KR,ar-SA} && \
touch
Your folder structure should look like this:
Adding translations
Now, let’s add translations. For each language, edit the JSON file you created in the previous step by adding key-value pairs for each translation. The key represents the item being translated, and the value is the corresponding text.
For example, the English (US) translations file might look like this:
// en-US/translations.json
{
  "home": {
    "welcome": "Welcome to the app!",
    "description": "This app supports multiple languages."
  }
}
For Korean and Arabic, you would have similar files, just with their respective translations. Here is what the file might look like:
// kr-KO/translations.json
{
  "home": {
    "welcome": "앱에 오신 것을 환영합니다!",
    "description": "이 앱은 여러 언어를 지원합니다."
  }
}
You can see this commit to have the translation files for all the languages in one go.
Configuring the i18n file
Create the i18n configuration file to setup i18next. This file initialises i18next and manages your translations. Here’s what the configuration file does:
Language Resources: Maps each language code (like en-US, ko-KR etc.) to its corresponding translation file.
Stored Language Preference: The app tries to retrieve the user’s language from AsyncStorage. If there’s no stored language, it defaults to the device’s language.
RTL Support: For languages like Arabic that are read from right to left, the layout direction is updated using I18nManager.
i18n Initialisation: this sets up the default language, fallbacks, and disables escaping values (escapeValue: false) for safer translations.
Error Handling: If any error occurs during initialisation, it defaults to English.
Saving Language: The selected language is saved to AsyncStorage for the next session.
For simplicity, you can copy the configuration file from this commit.
Implementation in Components
Now, let’s add the translations to your components. Below is an example of what this implementation would look like with a summary of the functions involved:
import React from 'react';
import { View, Text, Button } from 'react-native';
import "@/src/i18n";
import { useTranslation } from 'react-i18next';

const Dashboard = () => {
  const { t, i18n } = useTranslation();

  return (
    <View>
      <Text>{t('home_screen.welcome')}</Text>
      <Button title="English" onPress={() => i18n.changeLanguage('en-US')} />
      <Button title="Korean" onPress={() => i18n.changeLanguage('ko-KR')} />
      <Button title="Arabic" onPress={() => i18n.changeLanguage('ar-SA')} />
    </View>
  );
};

export default Dashboard;
Import the i18n configuration -importing the @/src/i18n configuration file created earlier ensures that all translations are loaded for use in your component. (Please adjust the import path if necessary.)
Using the useTranslation hook - the useTranslation hook from react-i18next provides access to the t function, which retrieves translations for specific keys. For instance, if your en-US/translations.json file contains an object with the property home_screen that includes the key welcome, you can access it in your component using t('home_screen.welcome').
Switching languages - the i18n.changeLanguage function allows you to switch between available languages.
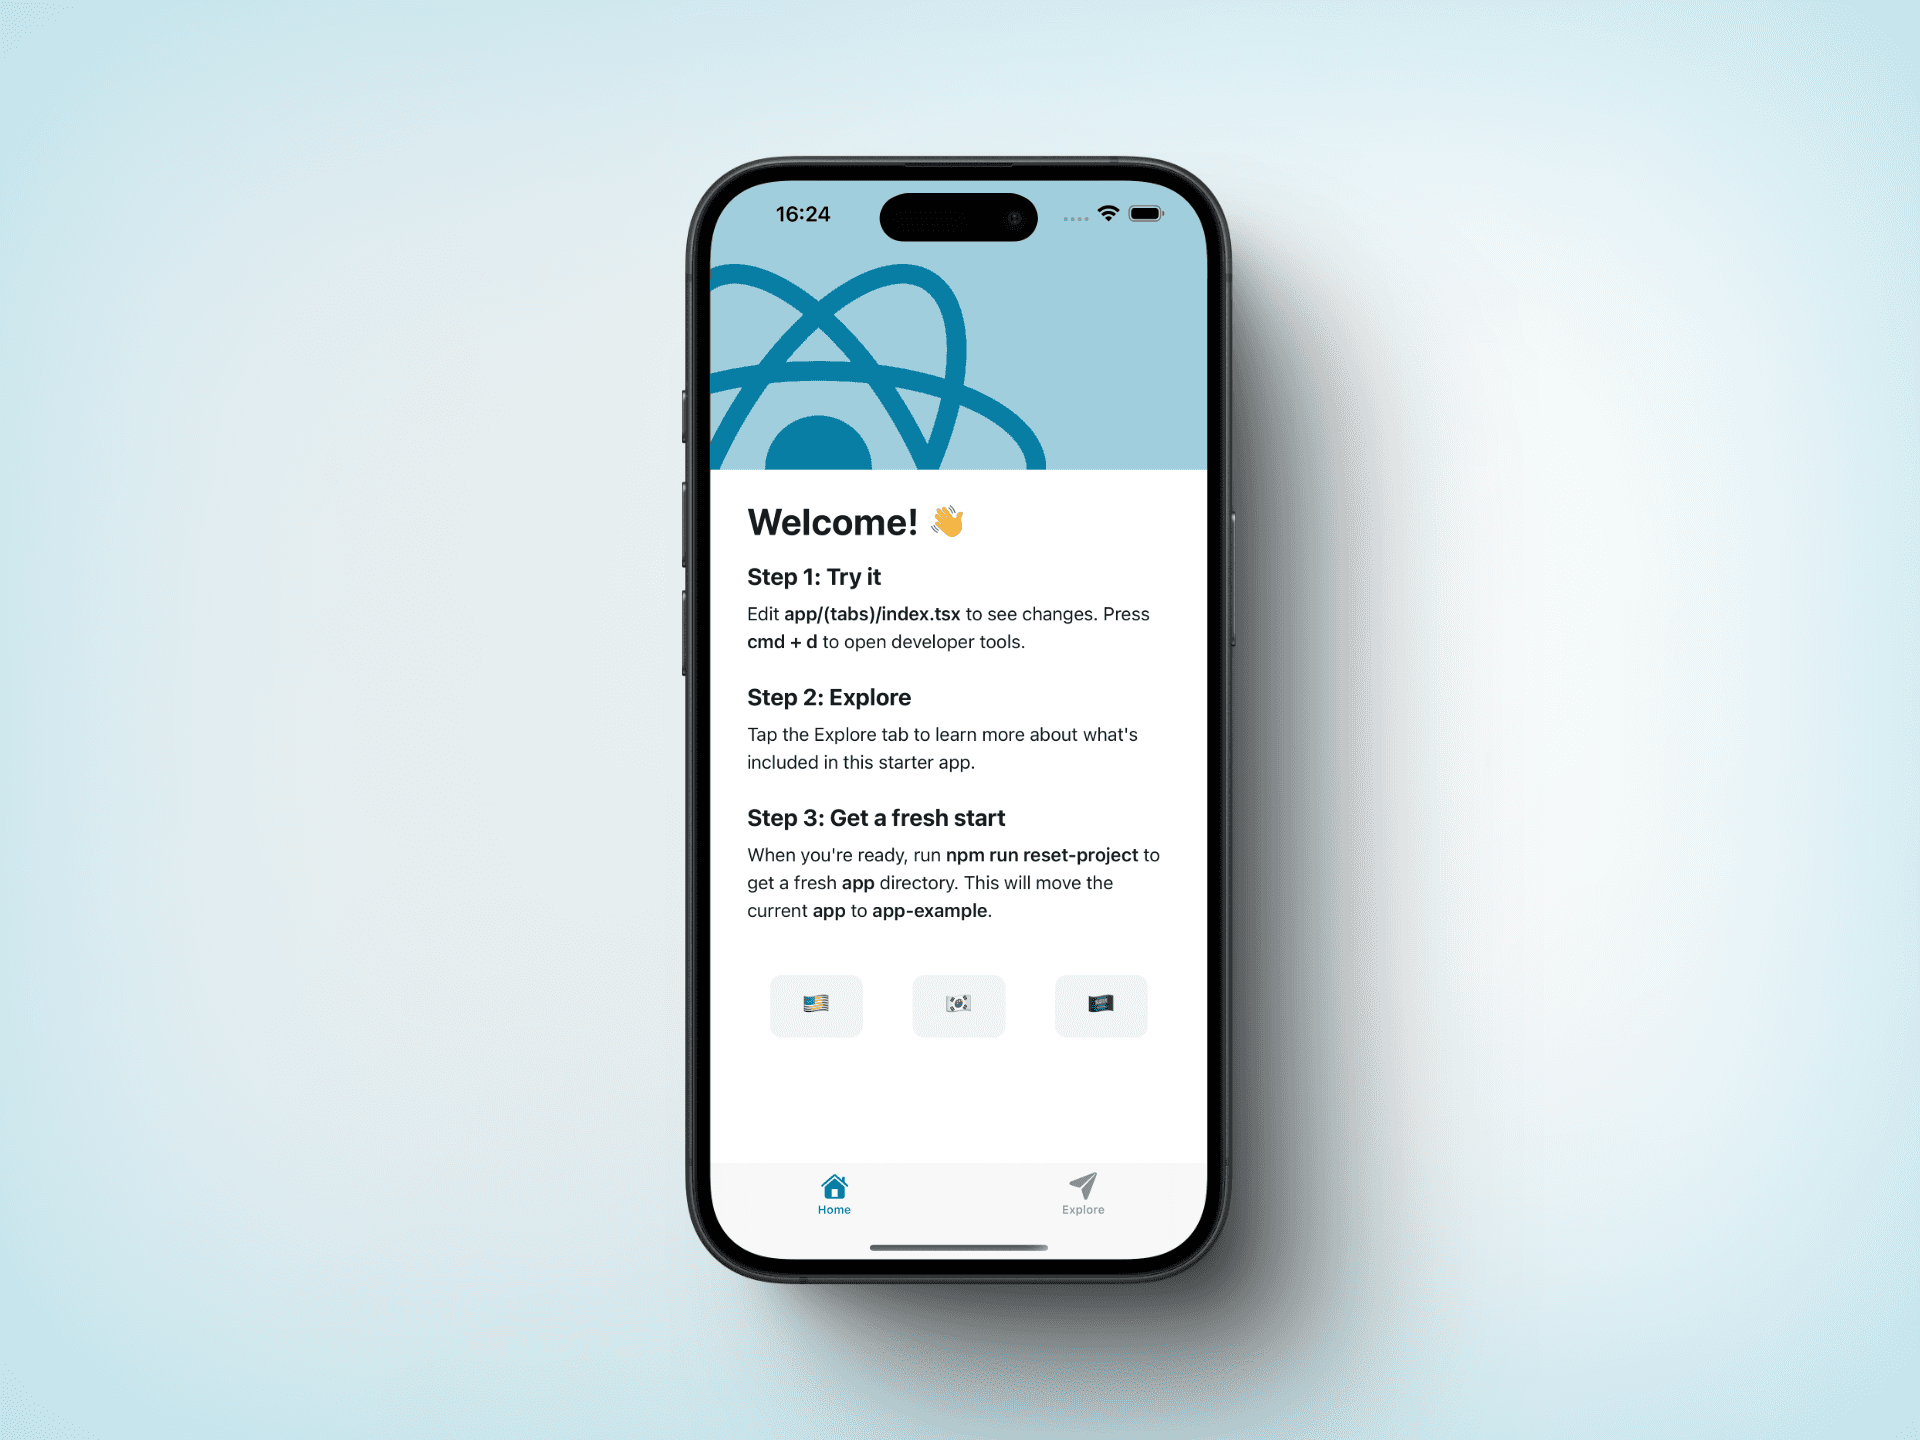
First, add code to create buttons for switching between English (US), Korean, and Arabic (SA). You can see this commit to apply the changes, and your app should appear as follows:
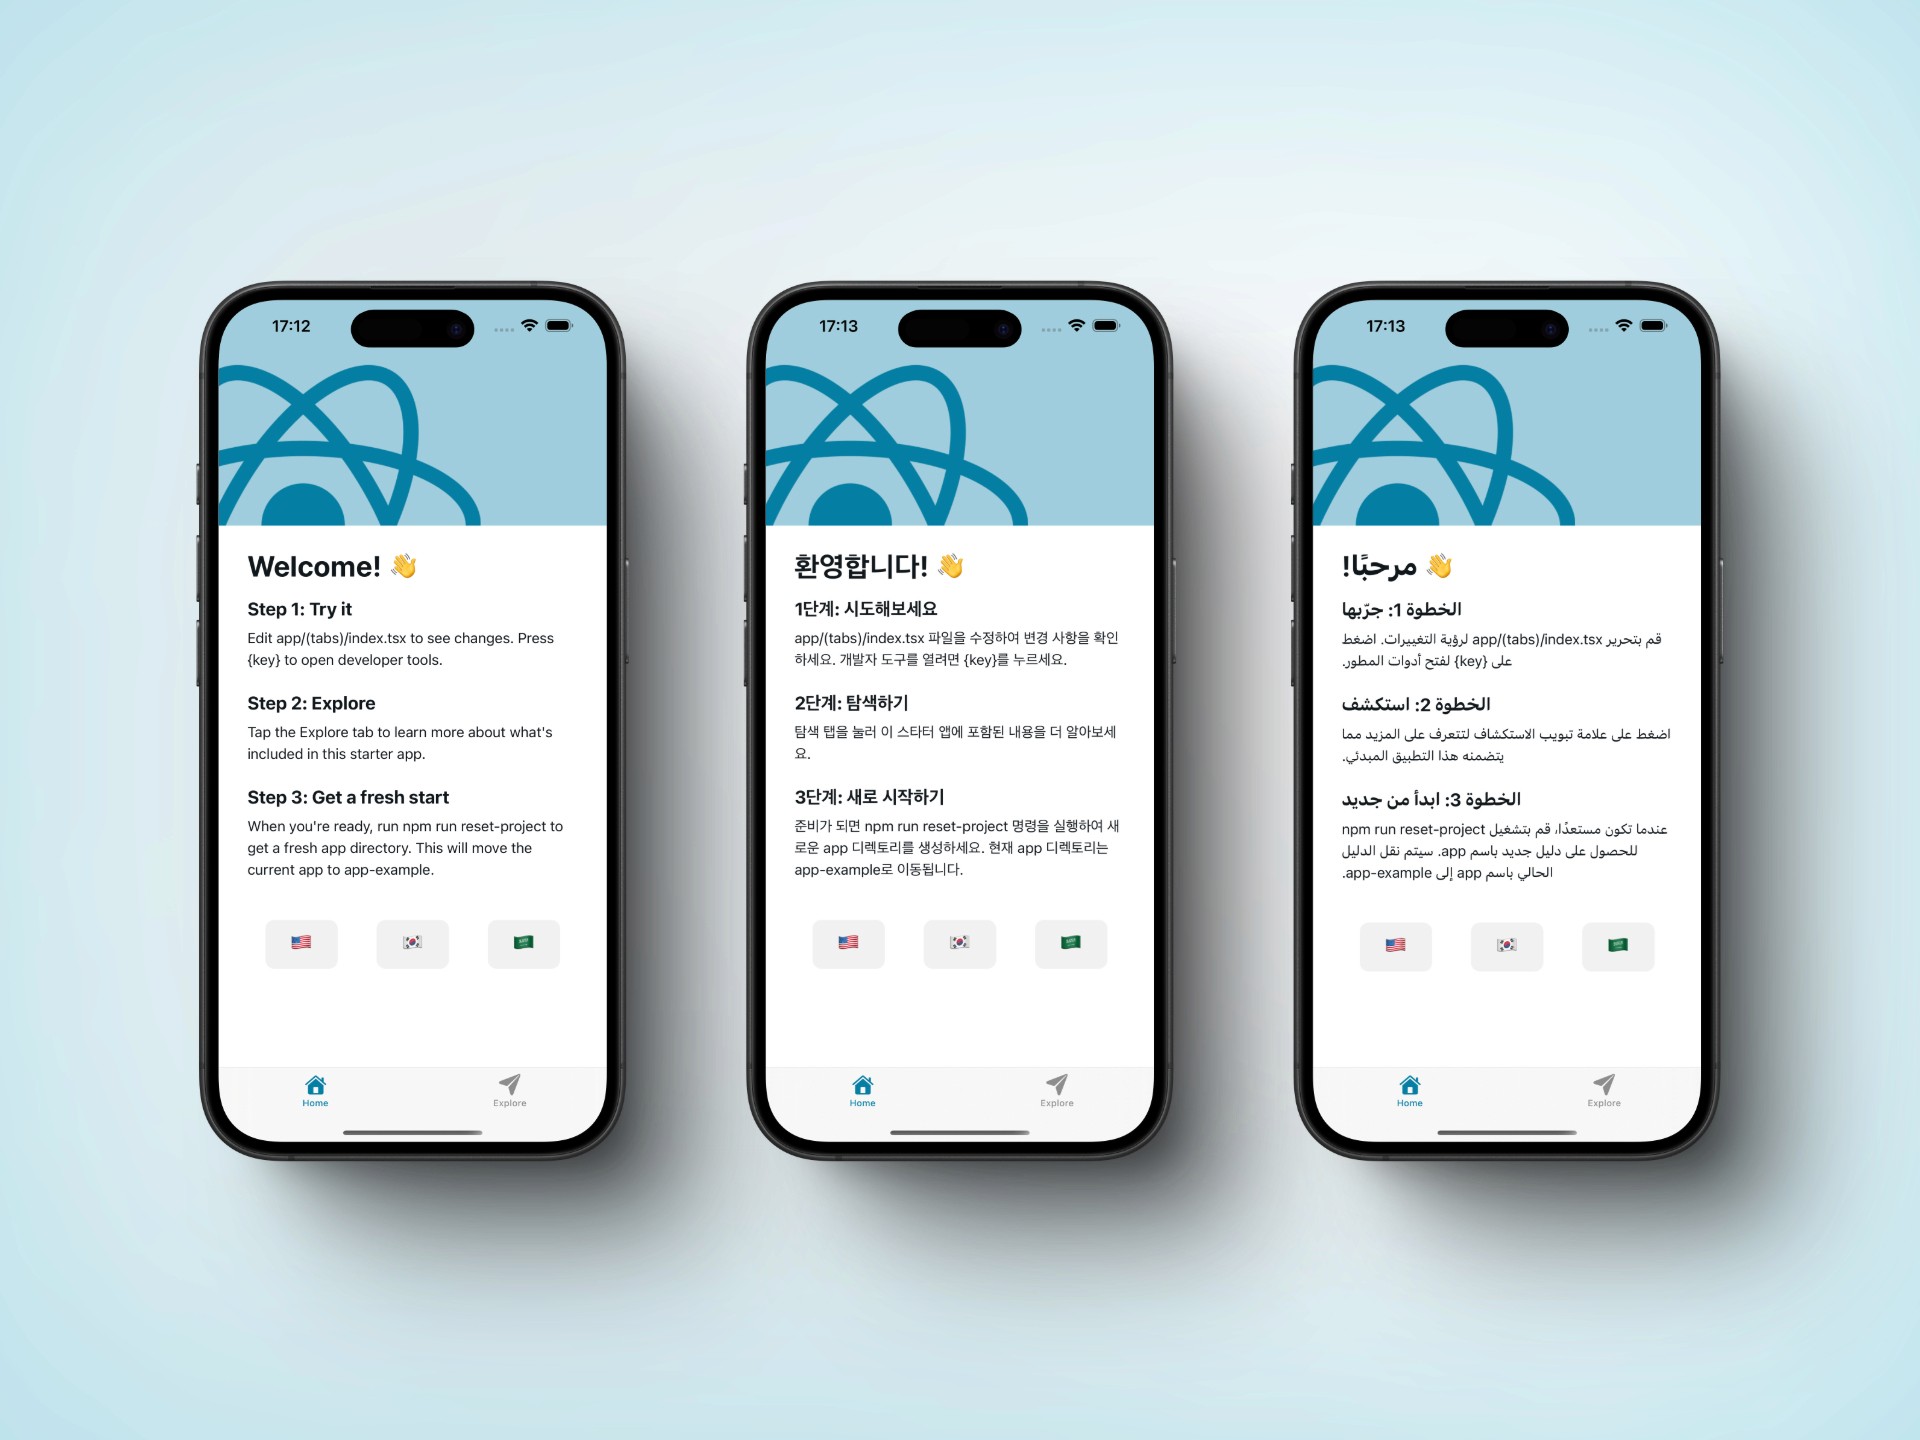
Next, apply the t function within your component. You can see this commit as well; once applied, the previously added buttons, when clicked, will re-render the component with the correct translations.
Handling String Parsing
In your translation files, you might encounter placeholder text such as {key}. Note that react-i18next expects placeholders to be wrapped in double curly braces, like {{key}}. If you don’t adjust this, the app will display {key} instead of replacing it with the corresponding value.
To fix this:
Either update all instances of {key} to {{key}} in your translation files, or
See this commit to automatically handle the change
Updating the bottom tab and Explore screen
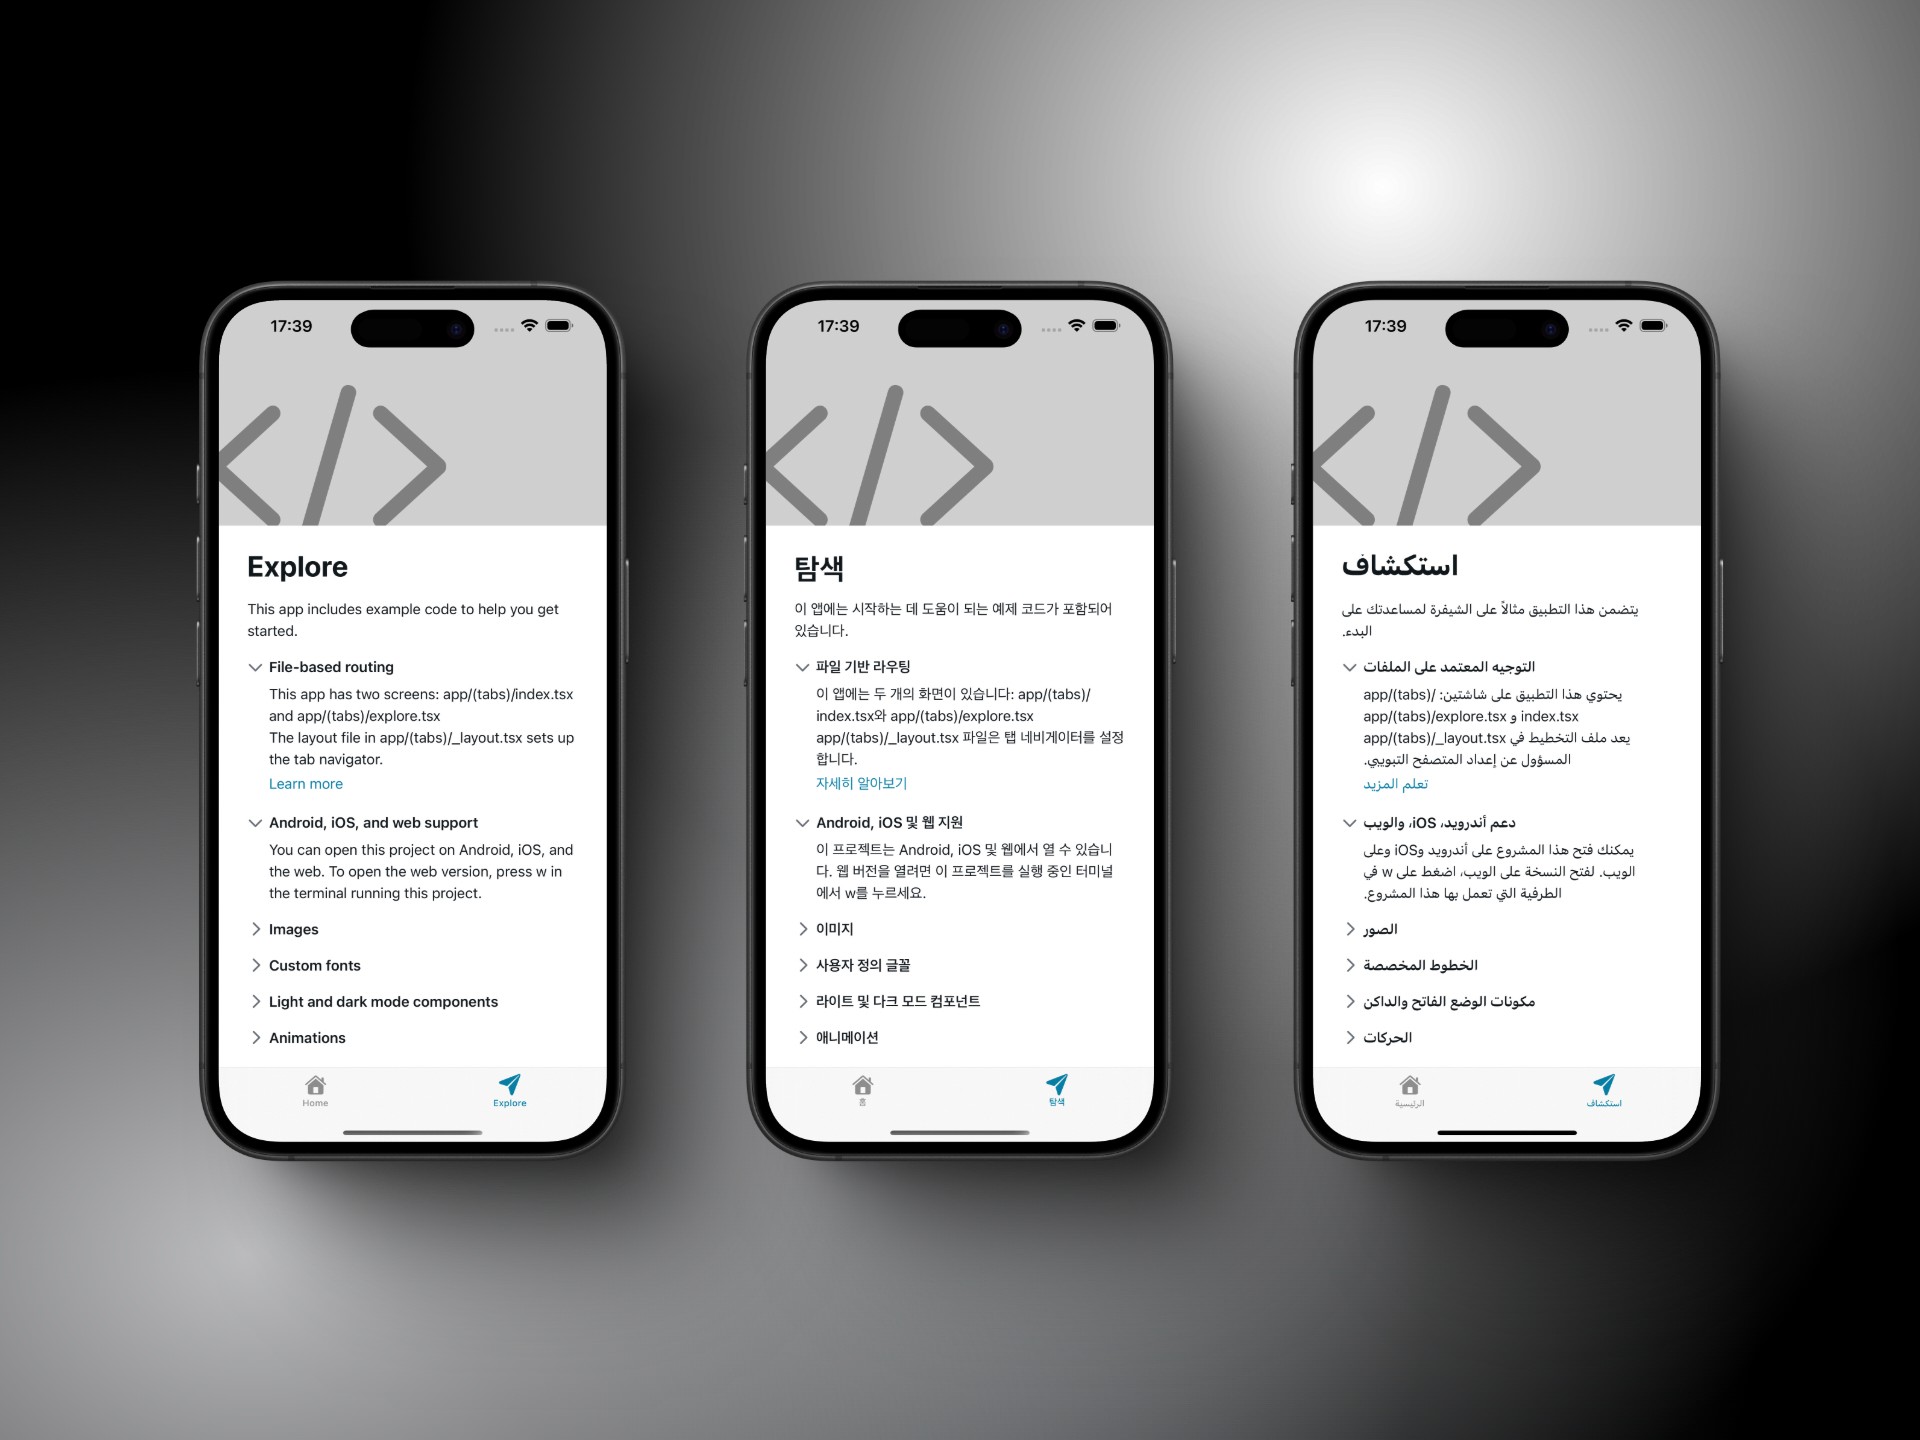
Lastly, add translations for the bottom tabs and other screens (such as the "Explore" screen). For example, the app/(tabs)/_layout.tsx file should reference the correct translations for “Home” and “Explore.”
You can see this commit for the changes where both tabs are fully translated as shown below:
Best Practices
Organise your translations: Keep your translation keys neatly arranged in nested objects. It’s a lifesaver when scaling or managing translations later.
Handle missing translations: Always set up fallback translations—nobody wants a broken UI just because a phrase isn’t translated.
Support language variants: If en-US isn’t available, make sure your app can gracefully fall back to en. Small detail, big impact!
Test RTL languages: Right-to-left (RTL) languages like Arabic need some extra care. Double-check that layouts and text alignment display correctly.
Cache translations: Fetching translations from a server and caching them locally (e.g., using AsyncStorage) is a win-win. It boosts performance and ensures your app works offline. For extra tips, the i18next docs have some great guidance on caching with React Native.
Conclusion
And there you have it! By following these steps, you’ve set up multi-language support in your React Native app. Now, you can confidently serve users from all over the globe in their preferred languages.
A quick recap before you go:
Organize your translations for easier management.
Plan for edge cases, like missing translations.
Test your app with different languages, including RTL ones like Arabic.
Cache translations to make your app faster and usable offline.
With these features in place, your app is not just ready for launch—it’s ready to scale globally! 🌍
Want to skip the heavy lifting? Check out Launchtoday.dev - an Expo boilerplate designed to help you build apps faster. It’s packed with features such as authentication, payments, including built-in support for multiple languages, so you can focus on creating the best experience for your users without worrying about setup.
Want to make your app accessible to a wider audience? Supporting multiple languages is key, and it's easier than you might think. In this guide, we’ll walk you through setting up i18next with expo-localization to create a flexible translation system in your Expo app. Ready to dive in? Let’s go!
If you would like to skip straight to the code, you can find a link to the project here.
Prerequisites
This tutorial is built using the Expo framework, so you should be familiar with how Expo works.
Setup and Installation
First off, if you don’t have an Expo project set up yet, do that using:
Once that’s done, it's time to install the packages you’ll need:
npx expo install expo-localization react-i18next i18next @react-native-async-storage/async-storage
That’s it for the setup. Alternatively, you can see this commit if you’d like to jump straight into this section. Here is a summary of the dependencies and what they do:
expo-localization- detects and retrieves the user’s device locale settings.i18nextis the core internationalisation engine that manages the translation logic and data.react-i18nextconnects i18next with React, providing components and hooks to easily implement translations within your React application.
Once all the dependencies have been installed, run the app on your simulator. You can use the following commands in the to view available iOS simulators and boot your preferred device (you can also run the app on Android):
If you have a specific iPhone version, such as the iPhone 16 Plus, you can also run:
When the app is running, it should appear as follows:
Project Structure
Next, create a well-organised structure for your translations. In this example, we support English (US), Korean, and Arabic (SA). You can run the following command to create the folders and files (or see this commit):
mkdir -p src/i18n/locales/{en-US,es-ES,ko-KR,ar-SA} && \
touch
Your folder structure should look like this:
Adding translations
Now, let’s add translations. For each language, edit the JSON file you created in the previous step by adding key-value pairs for each translation. The key represents the item being translated, and the value is the corresponding text.
For example, the English (US) translations file might look like this:
// en-US/translations.json
{
  "home": {
    "welcome": "Welcome to the app!",
    "description": "This app supports multiple languages."
  }
}
For Korean and Arabic, you would have similar files, just with their respective translations. Here is what the file might look like:
// kr-KO/translations.json
{
  "home": {
    "welcome": "앱에 오신 것을 환영합니다!",
    "description": "이 앱은 여러 언어를 지원합니다."
  }
}
You can see this commit to have the translation files for all the languages in one go.
Configuring the i18n file
Create the i18n configuration file to setup i18next. This file initialises i18next and manages your translations. Here’s what the configuration file does:
Language Resources: Maps each language code (like en-US, ko-KR etc.) to its corresponding translation file.
Stored Language Preference: The app tries to retrieve the user’s language from AsyncStorage. If there’s no stored language, it defaults to the device’s language.
RTL Support: For languages like Arabic that are read from right to left, the layout direction is updated using I18nManager.
i18n Initialisation: this sets up the default language, fallbacks, and disables escaping values (escapeValue: false) for safer translations.
Error Handling: If any error occurs during initialisation, it defaults to English.
Saving Language: The selected language is saved to AsyncStorage for the next session.
For simplicity, you can copy the configuration file from this commit.
Implementation in Components
Now, let’s add the translations to your components. Below is an example of what this implementation would look like with a summary of the functions involved:
import React from 'react';
import { View, Text, Button } from 'react-native';
import "@/src/i18n";
import { useTranslation } from 'react-i18next';

const Dashboard = () => {
  const { t, i18n } = useTranslation();

  return (
    <View>
      <Text>{t('home_screen.welcome')}</Text>
      <Button title="English" onPress={() => i18n.changeLanguage('en-US')} />
      <Button title="Korean" onPress={() => i18n.changeLanguage('ko-KR')} />
      <Button title="Arabic" onPress={() => i18n.changeLanguage('ar-SA')} />
    </View>
  );
};

export default Dashboard;
Import the i18n configuration -importing the @/src/i18n configuration file created earlier ensures that all translations are loaded for use in your component. (Please adjust the import path if necessary.)
Using the useTranslation hook - the useTranslation hook from react-i18next provides access to the t function, which retrieves translations for specific keys. For instance, if your en-US/translations.json file contains an object with the property home_screen that includes the key welcome, you can access it in your component using t('home_screen.welcome').
Switching languages - the i18n.changeLanguage function allows you to switch between available languages.
First, add code to create buttons for switching between English (US), Korean, and Arabic (SA). You can see this commit to apply the changes, and your app should appear as follows:
Next, apply the t function within your component. You can see this commit as well; once applied, the previously added buttons, when clicked, will re-render the component with the correct translations.
Handling String Parsing
In your translation files, you might encounter placeholder text such as {key}. Note that react-i18next expects placeholders to be wrapped in double curly braces, like {{key}}. If you don’t adjust this, the app will display {key} instead of replacing it with the corresponding value.
To fix this:
Either update all instances of {key} to {{key}} in your translation files, or
See this commit to automatically handle the change
Updating the bottom tab and Explore screen
Lastly, add translations for the bottom tabs and other screens (such as the "Explore" screen). For example, the app/(tabs)/_layout.tsx file should reference the correct translations for “Home” and “Explore.”
You can see this commit for the changes where both tabs are fully translated as shown below:
Best Practices
Organise your translations: Keep your translation keys neatly arranged in nested objects. It’s a lifesaver when scaling or managing translations later.
Handle missing translations: Always set up fallback translations—nobody wants a broken UI just because a phrase isn’t translated.
Support language variants: If en-US isn’t available, make sure your app can gracefully fall back to en. Small detail, big impact!
Test RTL languages: Right-to-left (RTL) languages like Arabic need some extra care. Double-check that layouts and text alignment display correctly.
Cache translations: Fetching translations from a server and caching them locally (e.g., using AsyncStorage) is a win-win. It boosts performance and ensures your app works offline. For extra tips, the i18next docs have some great guidance on caching with React Native.
Conclusion
And there you have it! By following these steps, you’ve set up multi-language support in your React Native app. Now, you can confidently serve users from all over the globe in their preferred languages.
A quick recap before you go:
Organize your translations for easier management.
Plan for edge cases, like missing translations.
Test your app with different languages, including RTL ones like Arabic.
Cache translations to make your app faster and usable offline.
With these features in place, your app is not just ready for launch—it’s ready to scale globally! 🌍
Want to skip the heavy lifting? Check out Launchtoday.dev - an Expo boilerplate designed to help you build apps faster. It’s packed with features such as authentication, payments, including built-in support for multiple languages, so you can focus on creating the best experience for your users without worrying about setup.